Snap together wood flooring, also known as float-in flooring or click lock flooring, refers to a type of engineered wood flooring designed with an interlocking system that allows the planks to be joined together without glue or nails. This floating floor system makes installation significantly easier compared to traditional tongue-and-groove hardwood floors.
Page Contents
- 1 What is Float-in Flooring?
- 2 Different Types of Interlocking Flooring Systems
- 3 Pros & Cons of Float-In Flooring
- 4 How to Choose the Best Interlocking Flooring
- 5 Preparing to Install Interlocking Flooring
- 6 Step-by-Step Floating Floor Installation
- 7 Maintaining Interlocking Flooring
- 8 The Pros & Cons of Snap-Together Floor Brands
- 9 The Costs of Float-In Flooring
- 10 Choosing Between Laminate vs. Vinyl vs. Hardwood Flooring
- 11 Conclusion
What is Float-in Flooring?
Float-in flooring, commonly referred to by various brand names like click-lock flooring or snap-together flooring, is a revolutionary flooring solution that completely transforms the process of installing hardwood floors. Unlike standard solid hardwood or engineered wood planks that require nailing or gluing the boards to the subfloor, float-in flooring features interlocking edges that allow the planks to be clicked or snapped together.
The float-in installation technique gets its name from the fact that the floor is not affixed to the subfloor below but rather “floats” above it. This is achieved through the click-lock system on the edges as well as the use of an underlayment pad placed between the subfloor and snap-together planks. The foam underlay provides a cushioned, quiet surface while also absorbing small subfloor imperfections.
Benefits of Float-In Flooring
- Easy “click-lock” installation
- Floating floor can be installed over most existing hard surfaces
- No glue or nails required
- Underlayment provides sound dampening
- Planks can be easily replaced if damaged
Overall, float-in flooring provides a fast and convenient installation combined with the beauty and warmth of real hardwood floors. The click-together planks lock tightly together to form a durable and long-lasting floor. Float-in floors can be installed by DIYers over a weekend without specialized tools, glues or nails.
Different Types of Interlocking Flooring Systems
There are a few different types of interlocking mechanisms used by float-in flooring brands:
Angle-Tap Floating Floors
Angle-tap planks feature beveled edges cut at an angled “tongue and groove” design. The top edge of the plank has the angled tongue which fits into the angled groove on the bottom edge of the adjoining plank. The angle lock system provides a very tight fit.
Click-Lock Floating Floors
Click-lock planks have interlocking ridges on the edges which “click” together when tapped into place. The plank edges click together tightly thanks to the shape of the locking ridges. Click-lock floors provide one of the easiest installation systems.
Fold-Down Floating Floors
Fold-down flooring features a plastic-based locking strip on the edge that folds down and snaps into the edge of adjacent planks. Installation involves angling the planks together and then folding down the plastic locking strip by hand or with a tapping block.
Pros & Cons of Float-In Flooring
Here is an overview of the major benefits and potential drawbacks of interlocking float-in floors:
Pros
- Fast, easy installation without glue or nails
- Can be installed over many existing hard surfaces
- Underlayment provides insulation and sound dampening
- Planks can be replaced if damaged
- Wide variety of colors and styles available
- Durable and scratch-resistant wear layer
- Provides the look and feel of real hardwood
Cons
- More expensive than laminates or vinyl plank flooring
- Not as moisture resistant as vinyl or tile
- Subfloor imperfections must be leveled
- Not ideal for concrete slabs with excess moisture
- Hollow sound in some low-quality products
- Planks can separate if overloaded or flooded
How to Choose the Best Interlocking Flooring
With many brands and types of float-in flooring on the market, it’s important to know what to look for when choosing products:
- Core material – High-density fiberboard (HDF) core provides best durability and structure.
- Wear layer – Thicker wear layers of real wood or vinyl coating prevent dents and scratches.
- Locking system – Look for angle-tap or click-lock for easiest installation.
- Underlayment – Pre-attached pads reduce steps and ensure proper underlay thickness.
- Warranty – Better products provide warranties of 25 years or more.
- Brand reputation – Choose top brands known for quality manufacturing.
Always check the manufacturer’s specifications and installation instructions as well. Opting for higher-end flooring from reputable brands like Kronotex, Pergo, Quick-Step and Shaw will provide the best long-term performance and aesthetics.
Preparing to Install Interlocking Flooring
Proper preparation is crucial prior to installing snap-together flooring. Here are some key steps:
- Remove existing flooring if necessary – tile, carpet, vinyl, etc. Make sure the subfloor is flat, clean and dry.
- Level any uneven areas of the subfloor using an appropriate leveling compound. Screw down loose areas.
- Test moisture levels – wood subfloors should be below 12% moisture content.
- Fill any cracks or holes with patching compound and sand smooth.
- Install appropriate foam underlayment. Many float-in floors come with pre-attached padding.
- Carefully plan plank layout and spacing from walls.
Taking the time to correctly prep the subfloor will result in a smooth, durable installation.
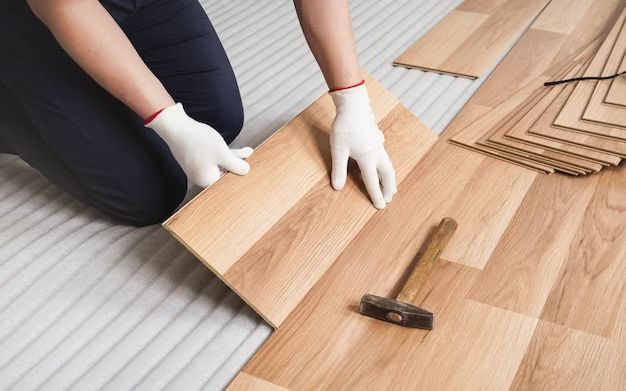
Step-by-Step Floating Floor Installation
Installing an interlocking floating floor is a relatively straightforward process compared to glued-down hardwood. Here is an overview of how to install snap-together flooring:
- Install underlayment if not pre-attached. Run perpendicular to planks.
- Begin installation from corner of room. Insert spacers for expansion gap.
- Connect short ends of planks together on first row. Tap together gently.
- Use scrap plank to ensure proper spacing from wall.
- Begin second row with plank cut to at least 6″ length. Stagger end joints.
- Drop planks together on short end while engaging side locking system.
- Use tapping block to gently tap planks into place. Do not use excessive force.
- Continue installing remaining planks, randomly staggering end joints.
- Use pull bar to engage final row of planks into place.
- Remove all spacing spacers. Install trim molding to cover expansion gaps.
Always refer to the manufacturer’s specific instructions as installation guidelines can vary between flooring brands. With some basic DIY skills, interlocking laminate and hardwood can be installed with speed and ease.
Maintaining Interlocking Flooring
Float-in floors are designed to be low maintenance, but some periodic care is required to keep them looking beautiful:
- Sweep or vacuum regularly to remove dirt and debris that can scratch planks.
- Wipe up spills immediately to avoid moisture damage.
- Use felt pad floor protectors under furniture legs.
- Avoid excessive water/moisture which can seep between planks.
- Use proper hardwood floor cleaners to gently clean floors.
- Re-apply finish coats as needed per manufacturer instructions.
- Planks can be replaced individually if heavily damaged.
By following the manufacturer’s care guidelines, interlocking floors should provide many years of beauty with minimal upkeep required.
The Pros & Cons of Snap-Together Floor Brands
There are many manufacturers producing float-in flooring. Here is an overview of key brands along with pros and cons:
Pergo Max Premier
Pros: Angle-tap locking system, pre-attached underlayment, scratchguard technology, lifetime residential warranty
Cons: Premium prices, limited color/style options
Shaw SafeHaven Vinyl Plank
Pros: Waterproof vinyl wear layer, fold-down locking strip, R2X stain protection, pet-friendly
Cons: Needs separate underlayment, limited 20-year warranty
Kronotex Mammut Plus
Pros: Click-lock system, pre-attached underlay, AC4 abrasion rating, 30-year warranty
Cons: Limited US distribution, tends to show scratches
Quick-Step Impressive Ultra
Pros: Uniclic click-lock install, scratch-resistant finish, moisture resistant core
Cons: Hollow sound if not installed correctly, delicate locking strips
Cali Bamboo Seaboard Oak
Pros: Floating click-lock flooring, woven textured finish, high-density core
Cons: Prone to some fading in sunlight, limited warranty period
The Costs of Float-In Flooring
Interlocking float-in floors provide an affordable alternative to glued-down engineered hardwood or solid wood. Here are some average price ranges:
Entry-Level Products
- Laminate planks – $1 to $3 per square foot
- Vinyl plank flooring – $2 to $4 per square foot
Mid-Range Products
- Hardwood planks – $3 to $6 per square foot
- Advanced polymer core planks – $3 to $7 per square foot
Premium Flooring
- Thicker hardwoods – $6 to $9 per square foot
- Commercial-grade products – $7 to $12 per square foot
Added costs may include underlayment, transition moldings, and any subfloor preparation needed. Professional installation will add $2 to $5 per square foot to the total cost.
Choosing Between Laminate vs. Vinyl vs. Hardwood Flooring
Float-in floors come in several core materials, each with pros and cons:
Laminate Flooring
Pros:
- Affordable, starting around $1/square foot
- Durable surface resists scratches
- Wide variety of realistic wood looks
- Easy click-lock installation
Cons:
- Susceptible to damage from excess moisture
- Hollow, plastic sound when walking on it
- Cannot be refinished over time
- Poor resale value
Luxury Vinyl Plank Flooring
Pros:
- Waterproof and dent-resistant
- Comfortable underfoot
- Floats over uneven subfloors
- Affordable $2 to $4 per square foot
Cons:
- Durability varies by product
- Not always pet claw resistant
- Can show indentation marks over time
- Less realistic than wood visuals
Engineered Hardwood Flooring
Pros:
- Timeless beauty and warmth of real wood
- Durable finishes resist wear and scratches
- Can be lightly sanded and refinished
- Adds value for home resale
Cons:
- More expensive (averages $4 to $8 per square foot)
- Susceptible to moisture damage
- Not always pet friendly
- Harder to install than click-lock vinyl or laminate
Consider factors like cost, durability, moisture resistance and ease of installation when choosing float-in flooring materials.
Conclusion
In summary, snap together wood flooring provides a fast, simple DIY installation together with the elegant look of real wood. Brands like Shaw, Pergo, Kronotex and QuickStep lead the way in innovation and quality. With basic tools and preparation, interlocking laminate and hardwood can transform the look and feel of any room in your home.