When installing baseboard molding in your home, one of the most important factors to consider is the angle at which you cut the pieces. Choosing the right cutting angle is crucial for getting tight, clean joints and seamless transitions from one wall to the next. But with different types of corners and transitions to account for, how do you determine the optimal cutting angle?
In this article, we’ll walk through the basics of figuring out the best angles for cutting baseboard to fit around both inside and outside corners. We’ll look at the three most common types of corners and explain how to calculate the angle cuts for each situation. We’ll also provide some tips and tricks for getting perfectly angled baseboard cuts.
Whether you’re a novice DIYer or a seasoned pro, read on to learn how to choose foolproof baseboard cutting angles and get professional-looking results.
Page Contents
- 1 Understanding the Three Main Types of Corners
- 2 Cutting Inside 90-Degree Corners
- 3 Cutting Outside 90-Degree Corners
- 4 Measuring and Cutting Uneven Angles
- 5 Tips for Achieving Perfect Miters
- 6 Cutting Baseboard Around Doors and Openings
- 7 Cutting Baseboard for Stairs
- 8 Using a Miter Box Versus a Power Miter Saw
- 9 Choosing the Best Baseboard Style for Your Home
- 10 Preparing Walls and Flooring for Installation
- 11 How to Calculate the Amount of Baseboard You Need
- 12 How to Install Baseboard
- 13 How Much Does It Cost to Install Baseboard?
- 14 Conclusion
Understanding the Three Main Types of Corners
When installing baseboard, you’ll encounter three main types of corners that require angled cuts:
Inside Corners
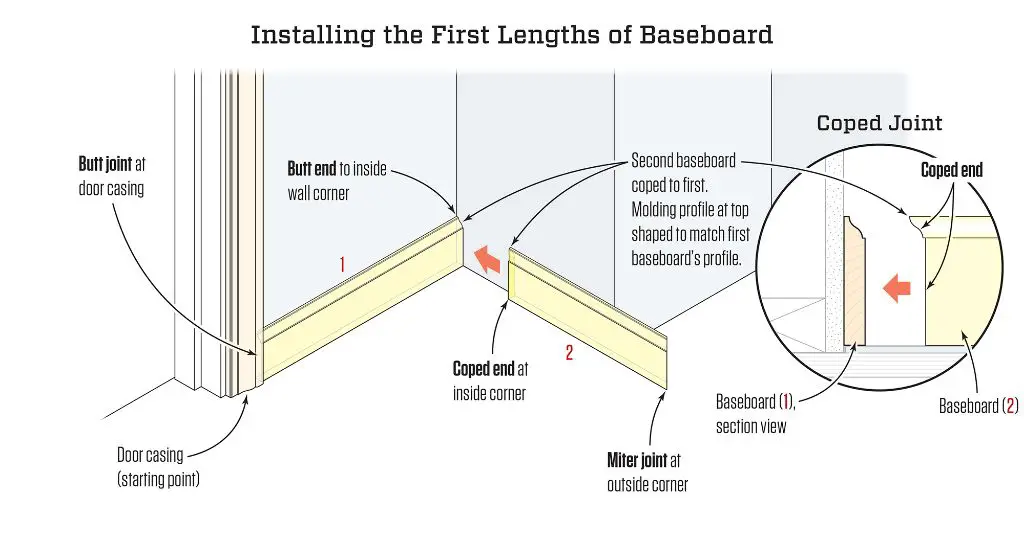
Inside corners are formed when two walls meet to create an internal angle. The most common inside corners in homes are 90-degree angles. To join baseboard on perpendicular walls that form a 90-degree inside corner, you’ll need to miter cut the ends at a 45-degree angle. This allows the two pieces to fit snugly together in the corner.
Outside Corners
An outside corner is created when two walls form an external angle. Like inside corners, the most common outside corners are at 90-degree angles. For these, you’ll need to cut the adjoining baseboard pieces at complementary 45-degree bevel cuts. When fitted together, the bevels will form a clean 90-degree outside corner.
Transitions Between Uneven Walls
Sometimes you’ll need to install baseboard where two walls meet at an angle other than 90 degrees, such as when a wall juts out or recedes. In these cases, you’ll need to determine the exact angle between the walls using a protractor and cut the baseboard ends accordingly to join the two sides cleanly.
Cutting Inside 90-Degree Corners
For a standard 90-degree inside corner, always miter cut the baseboard ends at 45 degrees. This allows the two mitered ends to fit together snugly, forming a continuous vertical corner.
To mark a 45-degree miter:
1. Measure and mark the overall length you need to cut the baseboard.
2. At the end of the mark, use a combination square or miter guide to draw a reference line at a 45-degree angle across the face of the board.
3. Cut along the reference line using a miter saw, chop saw, or hand miter box.
4. Repeat on the adjoining piece for the corner.
When cutting, make sure your saw blade is set exactly at 45 degrees to the fence so the miters are precise. Test fit the pieces and make minor adjustments as needed for a tight fit.
Cutting Outside 90-Degree Corners
For outside corners, make opposing 45-degree bevel cuts on the adjoining baseboards. To mark and cut the bevels:
1. Measure and mark the needed baseboard length as you would for an inside miter.
2. At the mark, use your miter guide to draw a 45-degree angle line across the back of the baseboard.
3. Cut along the line to make the bevel cut. The bevel should go in the same direction as the face of the baseboard.
4. Repeat the steps on the other piece, drawing the 45-degree line on the opposite end to create two complementary bevels.
5. Fit the corners together carefully so the bevels join to form a clean 90-degree outside corner.
Bevel cutting the ends allows them to overlap neatly while leaving the front baseboard surfaces aligned. Make minor tweaks for a perfect fit.
Measuring and Cutting Uneven Angles
For uneven angles where walls meet at less or more than 90 degrees, you’ll need to measure and mark the exact angle between the walls using a protractor. The basic steps are:
1. Use a protractor aligned vertically to measure the angle between the walls.
2. Transfer this angle to your miter saw and cut a test piece of baseboard. Test fit to ensure accuracy.
3. For inside corners, cut both ends of the corner pieces at the measured angle. For outside corners, cut opposing bevels at the measured angle.
4. Fit the pieces together and make minor adjustments to the cuts as needed for a tight joint.
Getting smooth transitions between uneven walls takes practice. Always measure carefully and perform test cuts to dial in the right angle before cutting your finished pieces.
Tips for Achieving Perfect Miters
Follow these tips for getting flawlessly angled baseboard miters:
– Use a miter saw with an accurate, tight-fitting miter gauge. Ensure the blade is set exactly at your measured angles.
– Cut the ends a little long, test fit, then make minor trim cuts for a perfect fit. It’s easier to shave off a bit more than cut new angles.
– For inside corners, cut the longer flat wall piece end first, then position its cut end against the wall to mark the shorter adjoining piece.
– Apply painter’s tape to the walls and position cut pieces to mark locations before fastening permanently.
– Use filler or putty to fill any minor gaps before painting for seamless corners.
– Consider using corner blocks or glue for added strength and stability.
Taking a methodical approach and double-checking angles will help you dial in precision cuts for beautifully fitted baseboard installations.
Cutting Baseboard Around Doors and Openings
In addition to cutting corners, you’ll also need to miter baseboard edges when transitioning across door casings and other openings.
The goal is to create tight seams between the walls and casings or opening trims. This involves bevel cutting the ends at 45-degree angles so the baseboard can wrap cleanly from the walls onto the casings.
For door casings:
1. Measure from the existing corner edge of the baseboard to the door casing edge.
2. Transfer this measurement and mark a 45-degree bevel cut line on the back of the baseboard.
3. Cut along the line so the bevel runs in the same direction as the front baseboard face.
4. Test fit and trim as needed for a tight transition.
5. On the opposite side, repeat the process to miter the baseboard end so it wraps onto the casing edge.
The same principle applies to cutting baseboard ends around openings like fireplaces. Always bevel cut the ends at 45 degrees to seamlessly transition onto adjacent trim pieces.
Cutting Baseboard for Stairs
Installing baseboard on staircases requires calculating angles that match the rise and run of each step. There are a few methods for achieving this:
– One option is to miter the baseboard ends at equivalent angles to the stair stringers. You can use a sliding T-bevel gauge set to the stringer angle to transfer measurements.
– You can also determine the approximate “average” stringer angle and miter the ends to match.
– For easier installation, some carpenters recommend cutting all tread pieces square and adding filler blocks behind joints.
– Prefabricated stair nose pieces are also available with pre-cut angles to simplify installation.
No matter the approach, always test fit and make adjustments to get tight seams. Staircases require extra precision cutting for attractive finished results.
Using a Miter Box Versus a Power Miter Saw
For top precision, most professionals recommend using a power miter saw when cutting baseboard joints. However, you can also get good results with a manual miter box if you don’t have a power saw available.
Here are some comparisons between the two:
| Miter Box | Miter Saw |
|---|---|
| – Less expensive basic option | – Provides professional-level accuracy |
| – Easy to set and adjust angles | – Allows fast, efficient cutting |
| – Limited to smaller stock sizes | – Can cut larger baseboard profiles |
| – Cutting process is slower | – Speeds up cutting time significantly |
| – Hand sawing requires more skill | – Simpler to make accurate cuts |
| – Difficult to guarantee 90° precision | – Ensure exact 90° accuracy |
For most homeowners, a basic miter box can provide sufficient accuracy for occasional small projects. But for frequent installs or larger rooms, a power miter saw is worth the investment for speed, precision, and easier cutting.
Choosing the Best Baseboard Style for Your Home
In addition to cutting technique, the actual style of baseboard you choose can impact the installation process and complexity of your project. Consider the following profiles:
1. Simple 1/4-round or 3/8-round – A rounded quarter- or half-circle profile is the easiest baseboard style to cut and install. The smooth, subtle shape complements a range of decor.
2. Cove – Slightly more complex than round profiles, cove has concave shaping with rounded edges. It hides gaps well and creates soft shadow lines.
3. Beaded – Beaded baseboard has a rounded top edge with a flattened bottom section. This style fits well with traditional or Craftsman decor.
4. Complex profiles – Highly decorative baseboards with reeded lines, scallops, or elaborate shapes take more skill to install seamlessly.
In general, the more complex the design, the greater the challenge in perfectly aligning angles and joints. Simple, versatile profiles like ogee or quarter-round offer an easier starting point for DIYers.
Preparing Walls and Flooring for Installation
For flawless results, be sure to prep your installation surfaces properly:
– Fill any gaps, cracks, or imperfections in walls and ensure they are smooth.
– Sand glossy painted walls to provide adhesion for caulk and construction adhesive.
– Remove existing baseboards gently to avoid damaging walls.
– Clean floors thoroughly and install any flooring before baseboard. Remove shoe moldings.
– Fill subfloor gaps and ensure all floors are level and smooth.
Taking time to fix flaws and clean surfaces means your baseboard can be installed straight, even, and without gaps that require excess caulk.
How to Calculate the Amount of Baseboard You Need
To determine how much baseboard material to purchase, you’ll need a few measurements:
1. Use a tape measure to measure the length of each wall at baseboard height. This gives you the linear footage needed for each wall.
2. Add up the totals for all walls in the room.
3. For inside and outside corners, add around 12″ of extra length for each corner to account for cutting.
4. For door casings and openings, add about 24″ of extra length each.
5. Finally, calculate 10% more for scrap or mistakes to be safe.
6. Total the final amounts and convert to number of pieces needed based on standard baseboard lengths (typically 8-12 feet).
Having more than enough is better than running short mid-project. Carefully planning quantities eliminates hassles and extra trips to the store.
How to Install Baseboard
Once properly measured and cut, follow these steps for installing baseboard:
1. Set a piece of baseboard in place and use painter’s tape at the top to hold it level and mark its location.
2. Run a bead of construction adhesive along the length of the wall just below the tape line.
3. Press the baseboard piece onto the adhesive and fasten it every 16-24 inches with finishing nails or screws, hitting studs where possible.
4. Use hole filler to patch nail holes. Consider pre-drilling holes to avoid splitting.
5. Continue securing pieces, using scarf joints or miter cuts to join ends neatly.
6. Caulk along the top and bottom edges for a smooth look. Avoid over-caulking.
7. Fill all gaps and finish with trim paint for a flawless look.
Take care not to dent drywall while fastening. Pre-drill as needed and set nails just below the wood surface. Follow all molding manufacturer instructions.
How Much Does It Cost to Install Baseboard?
If hiring a professional, expect to pay an average of $3 to $4 per linear foot for basic baseboard installation. Prices range from $1 to $6 per foot depending on factors like:
– Baseboard type – More ornate profiles cost more.
– Labor rates in your area.
– Level of surface preparation needed.
– Total length being installed. Longer runs are more efficient.
– Accessibility. Tight corners or high ceilings increase cost.
Other charges may include disposal fees, materials/tools, or minimum service call rates. Get an itemized estimate and compare several quotes.
Conclusion
Choosing the optimal cutting angles is crucial for properly installing baseboard trim for an attractive, seamless look. By learning how to accurately measure and cut inside corners, outside corners, and transitions for any angle, you can achieve professional-quality results. With the right tools, careful prep, and precise cutting techniques, you’ll be ready to tackle baseboard installation in any room.