When it comes to selecting the right size of wood for making a french cleat, there are a few key factors to consider. The thickness, width and length of the wood will all impact how strong, stable and functional the cleat is for whatever you want to hang on your wall. Taking the time to think through your needs and options will ensure you get the best results.
Page Contents
What is a French Cleat?
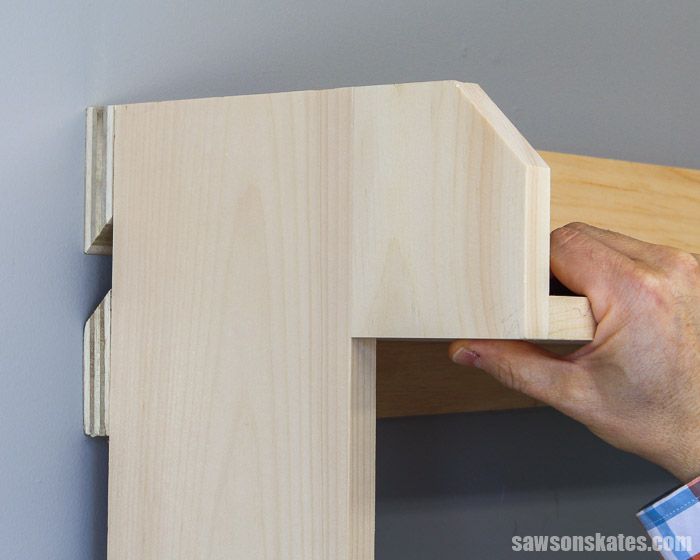
A french cleat is a simple yet effective hanging system that uses angled cuts on two boards to create a strong mount. One board is securely fastened to the wall, while the other is attached to the back of whatever you want to hang. When you fit the two cut boards together, the angled edges interlock tightly to hold the object in place under its own weight.
French cleats are commonly used for hanging cabinets, shelves, artwork, tools and other heavy items on walls and workshop spaces securely. The strength comes from joining two angled cuts to create a tight wedge. And since one board is on the wall and the other on the item being hung, no nails, screws or other visible hardware are needed.
Why Choose Wood for a French Cleat?
Wood is the most common and traditional material used to make french cleats. It has many benefits that make it ideal for this application:
- Strength – Wood can support heavy weight when properly installed.
- Stability – Wood cleats maintain their rigidity and integrity over time.
- Easy to cut – The angled shape needed for a cleat is simple to achieve with wood.
- Takes fasteners – Wood can be secured with screws and other hardware.
- Affordable – Many wood types are budget-friendly options.
- Aesthetically pleasing – Wood matches well with cabinets, shelves, etc.
Other materials like metal, plastic or composites could potentially be used. But wood remains the most common choice based on its strength, workability, appearance and cost effectiveness.
How Thick Should the Wood Be?
When selecting wood for a french cleat, the thickness is one of the most important considerations. Here are some guidelines on choosing the right thickness:
- 3/4 inch – This is the most common thickness used for smaller cleats meant to hold less than 50 lbs.
- 1 inch – For medium duty cleats meant to hold 50-100 lbs, 1 inch provides added strength.
- 1-1/2 inches – Heavy cleats built for 100-150 lbs of weight benefit from wood this thick.
- 2+ inches – Extra heavy cleats made from 2 inch lumber or thicker are best for hanging 150+ lbs.
In most cases, choosing a board thickness between 3/4 inch and 1-1/2 inches will give you the best results. Going too thin risks the cleat splitting or failing. But very thick wood can be unnecessarily heavy. The chart below summarizes recommended thicknesses based on estimated weight capacity needs:
| Weight to be Supported | Recommended Wood Thickness |
|---|---|
| Under 50 lbs | 3/4 inch |
| 50-100 lbs | 1 inch |
| 100-150 lbs | 1-1/2 inches |
| Over 150 lbs | 2+ inches |
What Width Should You Choose?
The width of the boards used for your french cleat will impact both strength and appearance:
- 3-5 inches – This is a common width for smaller, lighter duty cleats. It provides ample strength without using overly wide boards.
- 5-7 inches – For medium to large cleats meant to hold 50 lbs or more, a width between 5-7 inches helps distribute weight.
- 8+ inches – Extra wide boards up to 8 inches or more can be used for heavy duty cleats meant to hold 100+ pounds.
Wider boards help spread out the load placed on the cleat. But excessively wide boards can be unnecessarily large and bulky. For most homeowners’ needs, choosing a width between 3-7 inches will provide ideal results.
How Long Should the Wood Be?
Determining the correct length for your french cleat involves two considerations:
- Item being hung – The board attached to your cabinet/shelf/artwork needs to be slightly shorter than the width of the item so cleat joints are not visible.
- Wall space – The wall board should be long enough to adequately support the weight. As a rule of thumb, make it 1.5-2 times the length of the item’s board.
For example, if hanging a 30 inch wide cabinet, you may cut the cabinet’s cleat board to 28 inches. And cut the wall’s cleat board to 45-60 inches to securely support the span.
When in doubt, making both cleat boards longer than strictly needed provides extra strength. Just be sure they meet cleanly without gaps at joints.
What Type of Wood is Best?
Nearly any type of wood can be used to make french cleats. But some varieties are better choices based on cost, strength and workability:
Best Woods for Cleats
- Pine – Pine is very affordable and cuts cleanly while still being fairly strong. Pine comes in several varieties with yellow pine as a top choice.
- Poplar – Poplar is an economical hardwood that is easy to work. It cuts cleanly and holds screws securely.
- Oak – For added strength, oak is stronger than pine while not being too expensive.
- Maple – Maple cuts smoothly and uniformly for clean fitting cleat joints.
Woods to Avoid
- Plywood – Plywood can crack at the edges when cutting angled cleats.
- Particle board – Particle board is too fragile and may not support heavy loads.
- MDF – MDF does not handle screwed joints well and may split over time.
The most cost effective woods that still provide good strength and workability are non-hardwoods like pine, whitewood, fir or spruce. But hardwoods like oak and maple will give you enhanced sturdiness for heavy duty cleat needs.
Cutting Tips for High Quality Cleats
To achieve tight fitting, long lasting french cleats, follow these tips when making your cuts:
- Use a table saw or circular saw to cut straight, clean edges.
- Set the blade angle to 30 or 45 degrees for the proper slope.
- Cut along the wood’s grain – never across the grain.
- Make test cuts in scrap wood to check your angle.
- Cut both boards to precisely the same angle for a snug fit.
- Sand cut edges completely smooth to maximize contact area.
Taking extra care during cutting will mean tighter joints and better performance. A few test cuts to dial in the angle before cutting your final boards can make a big difference.
Installation Tips
Once cut, installing french cleats properly will keep whatever you hang safely on your wall:
- Predrill holes – Drill pilot holes before driving screws to prevent splitting the wood.
- Use sturdy fasteners – For the wall cleat, use 2-3” wood screws anchored into studs or masonry anchors.
- Attach securely – Drive screws every 8-12” along the cleat’s length to distribute weight.
- Allow a supporting ledge – The bottom of the item should rest on a small ledge or spacer so weight is not all on the cleat.
- Use broad cleats for heavy items – Increase cleat width and thickness for large shelves or cabinets to spread out the load appropriately.
With proper installation into solid framing or masonry, a french cleat provides an incredibly strong hanging method. Test the strength before loading valuable items by hanging on the mounted cleat yourself.
Conclusion
French cleats made from wood offer a simple, effective system for securely mounting shelves, cabinets, artwork and more to walls. Choosing the right thickness, width, length and type of wood will ensure your cleats are strong enough for whatever projects you have in mind.
For most home uses, a 3/4 to 1 inch thick board, 5-7 inches wide, made from pine, poplar or oak will give you an ideal balance of strength, cost and ease of installation. Carefully cutting matching 30-45 degree angles and predrilling all holes before screwing into solid framing will result in a cleat that safely supports display items for years to come.
With a properly made and mounted french cleat system, you’ll gain attractive, sturdy storage and display space anywhere you need it. This simple yet versatile hardware option has been used for centuries because of the dependable strength that results from interlocking angled cuts of wood.