Drip edge flashing is an important component in window installation and waterproofing. It is a piece of metal that is installed at the top of windows and doors to direct water away from the wall and window framing. Proper drip edge flashing prevents water infiltration and damage. This article will provide a comprehensive overview of drip edge flashing, answering key questions like what it is, why it’s needed, what it’s made of, how it works, requirements, costs, and proper installation. With helpful summaries, tables, images and subheadings, readers will gain a full understanding of this essential building envelope component.
Page Contents
What is Drip Edge Flashing?
Drip edge flashing is a thin, L-shaped piece of metal that is installed above windows, doors, and other exterior openings. The vertical leg of the L shape sits against the window or door frame, while the horizontal leg extends out over the edge of the frame. It overhangs the window slightly and has an outward projecting lip or drip edge at the bottom. This is why it is called “drip edge” – the projecting lip allows water to drip freely off and not run back towards the window.
Functions of Drip Edge Flashing
- Overhangs the window frame to protect it from water infiltration
- Provides a drip edge to direct water away from the window and wall
- Creates a watershedding layer above the window
- Integrates with the weather resistive barrier above the window
- Prevents moisture from entering the wall cavity
In summary, drip edge flashing acts as a water diversion system, ensuring moisture drains off the frame and does not penetrate the vulnerable window-wall transition area. Correct installation is crucial for proper dripping and water management.
Why is Drip Edge Flashing Needed?
There are several important reasons why drip edge flashing is an essential component in window installations:
Prevents Water Infiltration
Without drip edge flashing, water would be able to seep behind the window frame and into the wall cavity. This can lead to rot, mold growth, structural damage and other expensive repairs. The drip edge creates a watershedding layer that prevents infiltration.
Protects Window Frames
By overhanging the edge of window frames, drip edge flashing prevents water from pooling on the frame and joints. This keeps the wood, vinyl or metal window components protected from moisture damage.
Integrates Flashing System
Drip edge is one part of a complete flashing system. It integrates with the building wrap or weather resistive barrier above the window and the side window flashing pieces. The entire system is designed to redirect water out and down the exterior facade.
Bridge Between Roof and Wall Flashing
For some roof-wall intersections, the drip edge provides continuity between the roof flashing and wall flashing. This bridges the two water shedding systems.
Required by Code
Most building codes require drip edge flashing as part of proper window and door installation. Skipping this step usually results in a code violation.
In summary, drip edge flashing is a required protective layer that serves many important waterproofing functions.
Where is Drip Edge Flashing Used?
Drip edge flashing is utilized in the following exterior building locations:
- Above window frames
- Above door frames
- Above sloped roof lines
- As part of roof edge flashing details
- Surrounding skylights and other roof openings
- Above wall openings like vents
- Anywhere a horizontal surface meets a vertical surface
It is especially important above windows, doors, and sloped roofs where water drainage overlap is critical. Careful installation in these areas prevents interior water damage.
What Materials are Used?
There are several material options for drip edge flashing:
Aluminum
- Most common drip edge material
- Affordable, lightweight and durable
- Easy to cut and install
- Long lifespan but can be dented
- Comes in mill finish, anodized, or with baked-on enamel coatings
Galvanized Steel
- Durable, long lasting
- Withstands high wind
- Can be pre-finished with paint or coatings
- Difficult to cut onsite
Copper
- Extremely durable and naturally weather resistant
- Easy to work with
- Very long lifespan – lasts several decades
- Expensive compared to other options
Vinyl
- Affordable
- Easy to work with and cut
- Shorter lifespan – may need replacement in 10-20 years
- Prone to expansion and contraction
In most cases, aluminum or galvanized steel are good material choices. Copper offers excellent longevity for high end builds. Vinyl can work for simple jobs but won’t last as long.
How Does Drip Edge Flashing Work?
Drip edge flashing works via a very simple mechanism:
- Overhangs the window frame and wall sheathing slightly
- Water hits the overhang and is directed out and down
- The angled drip edge lip further jets water drip outward off the framing
- Water drips harmlessly off the bottom edge instead of back towards the window
This basic concept relies on proper overhang distance, angle, and installation. When done correctly, water is efficiently managed. Key factors include:
- Overhang distance – 1/4 to 3/4 inch is typical
- Drip edge angle – 30 to 45 degrees is optimal
- Proper fastening – avoid distorting the drip edge lip
- Sealing – prevent leaks at seam connections
- Wall overlap – drip edge sits above weather barrier layer
With ideal overhang, angle and integration, the drip edge provides fail-safe water protection.
Drip Edge Flashing Requirements
To work effectively, drip edge flashing needs to meet certain material and installation requirements:
Material
- Non-corrosive metal – aluminum, galvanized steel, copper
- Minimum 0.019 inch thick
- Overlap seams 2 inches minimum
Installation
- Installed above weather barrier layer on wall
- Overhang window frames minimum 1/4 inch
- Extend minimum 2 inches past window jambs
- Angled drip edge 30-45 degrees
- Fastened securely to framing without distorting lip
- Sealed at all connections and seams
- Integrated with other flashings
Meeting these material specs and installation guidelines ensures proper water management performance.
Drip Edge Flashing Cost
The cost of drip edge flashing depends on several factors:
- Material: Aluminum is most economical. Copper is premium.
- Size: More linear feet costs more.
- Prefabricated vs Site Fabricated: Pre-formed is simpler but costs more.
- Installation Labor: Contractor rates impact overall cost.
- Accessibility: Simple front access is cheaper than high/hard to reach areas.
Some typical price ranges:
| Aluminum | $2 – $4 per linear foot |
| Galvanized Steel | $3 – $6 per linear foot |
| Copper | $10 – $20 per linear foot |
Prefabricated options in aluminum or vinyl are $4 – $8 per linear foot.
For a typical 25 linear foot window with aluminum drip edge, expect around $100 – $150 installed. Higher for copper or difficult access areas.
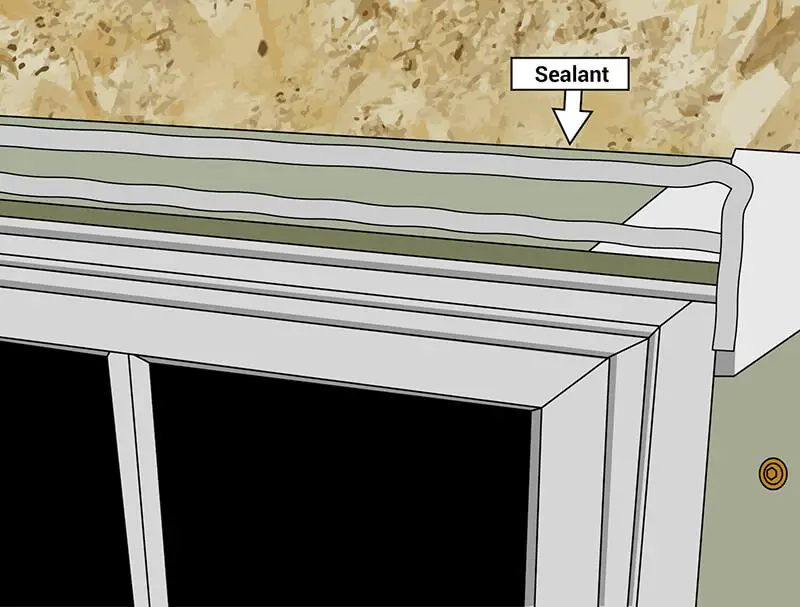
How to Install Drip Edge Flashing on Windows
Follow these steps to properly install drip edge flashing above window frames:
Preparation
- Cut drip edge material to desired length based on window width – add extra on each side for overhang and endlap.
- Cut away exterior wall weather barrier several inches above window to expose sheathing.
- Temporarily install window per manufacturer instructions.
Installation
- Place drip edge against top of window frame so that lip overhangs by 1/4 – 3/4 inches.
- Nail or screw drip edge into wall sheathing every 6 – 8 inches.
- Avoid distorting drip edge lip during fastening.
- Seal underside and seams with outdoor silicone sealant.
- At ends, overlap pieces minimum 2 inches.
- Extend drip edge 2 inches past window jambs.
- Reattach wall weather barrier over drip edge upper flange.
- Seal all connections and seams.
Finishing
- Install head flashing above drip edge integrated with weather barrier.
- Install side jamb flashings that overlap drip edge ends.
- Seal window perimeter with backer rod and sealant.
- Test water drainage by spraying with hose.
This completes a secure drip edge flashing installation that will protect the window and wall from water damage.
Conclusion
Installing drip edge flashing is an essential best practice for window and door installations. This simple component serves many important water management functions. With proper material selection, sizing, and installation, drip edge will shed water, prevent infiltration, and protect vulnerable openings. By following the guidelines and steps covered in this article, any builder or contractor can correctly flash windows or doors with effective drip edge. Paying attention to this detail is well worth avoiding expensive damage and repairs down the road.