Sanding trim like baseboards, door and window casings, and decorative moldings is an important step when preparing surfaces for painting. Properly sanded trim allows paint to adhere smoothly and evenly. The goal when sanding is to remove any gloss or sheen from previous finishes, smooth out any uneven surfaces, and eliminate dust or debris that could affect the paint job. While sanding trim is necessary, it can also be time consuming and tedious without the right tools and techniques. Understanding the easiest methods and sanding equipment will help streamline the process.
Page Contents
Why Sand Trim?
Sanding serves several important purposes when prepping trim:
- Removes existing paint or finish – Sanding will scuff up and eliminate any prior glossy coatings so the new paint can properly grip the surface.
- Smooths uneven areas – Old trim often has cracks, peeling sections, or rough spots from previous damage. Sanding levels out these imperfections.
- Creates texture for paint adhesion – The roughened surface left after sanding enables the paint to cling tightly.
- Removes loose material and debris – Sanding gets rid of any dust, dirt, or loose particles so only a clean surface remains for painting.
Neglecting to sand trim can lead to problems like peeling, chipping, or uneven paint coverage down the road. Taking the time to properly sand will ensure your painted trim holds up and looks great for years.
Sanding Equipment
To make the process easier, it’s key to have the right sanding tools. Options include:
Hand Sanding Blocks

Handheld blocks made of rubber or wood allow you to grip and sand small areas by hand. They have a flat surface to attach sandpaper. Use sanding blocks for detailed areas like moldings, crevices, and tight corners.
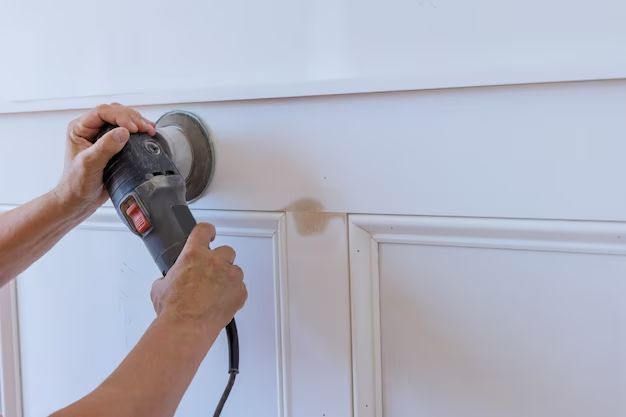
Power Sanders

Electric sanders, like palm sanders and oscillating tools speed up sanding on large flat trim surfaces like baseboards and window casings. They quickly remove existing finishes and provide smooth results. Use extra caution on detailed moldings.
Sandpaper
Having an array of sandpaper grits will allow you to complete all stages of sanding:
| Grit | Purpose |
|---|---|
| 80-100 grit | Rough sanding to strip paint/finishes |
| 120-150 grit | Medium sanding to smooth surfaces |
| 180-220 grit | Fine sanding for final smoothing |
It’s often helpful to begin sanding with a coarser 80-100 grit paper to remove existing finishes, then work up to a fine 220 grit for the final polish.
Sanding Techniques
Proper technique will also optimize your sanding work:
Always sand with the grain
Moving your sandpaper in the same direction as the wood grain helps avoid scratching the surface. Gently sanding with the grain creates a smooth finish.
Apply even pressure
Make sure to apply firm, even pressure as you sand. This will help ensure you smooth the surface uniformly. Avoid pressing too hard in any one spot, which can dig into the wood.
Overlap sanding strokes
Be sure each sanding stroke slightly overlaps the previous one. This method will produce a consistently smooth surface. Sanding randomly can lead to uneven, scratchy results.
Keep surfaces clean
Frequently wipe away dust and debris as you sand to prevent it from building up on the sandpaper. Clogged sandpaper won’t sand effectively. Tack cloths help remove dust between sanding sessions.
Work methodically
Move slowly and systematically across the surface for the best outcome. Trying to rush through sanding often leads to incomplete results. Take the needed time to fully smooth each section.
Safety Tips
Proper precautions will also make the job safer:
- Wear eye protection and a dust mask – Sanding produces fine debris and dust that can irritate eyes and lungs if inhaled.
- Ensure adequate ventilation – Work in a well-ventilated area to allow dust to dissipate.
- Clean up thoroughly – Use a shop vacuum and damp cloth to clean up dust and particles after you finish sanding.
- Handle electric sanders with care – Improper use of power tools can result in injury, be cautious of fingers near moving parts.
Taking key safety measures will help reduce risks that accompany sanding trim.
Most Common Sanding Mistakes
Those new to DIY trim sanding often make these key mistakes:
- Using worn out sandpaper – Old sandpaper with worn grit won’t effectively scuff the surface. Start with new sandpaper.
- Applying too much pressure – Over-pressing can dig divots into the wood rather than smoothing it.
- Not sanding evenly – Random sanding motions create an uneven surface. Always sand with the grain.
- Failing to clean as you go – Letting dust build up clogs the sandpaper and leads to swirl marks.
- Using too fine of grit – Starting with 220 grit or higher won’t scuff up existing finishes.
Avoiding these common errors will vastly improve your sanding work on trim.
Sanding Checklist
Follow this checklist for the easiest experience:
- Gather necessary sanding blocks, power sanders, 80-220 grit sandpaper, tack cloths, dust masks, and eye protection.
- Remove any hardware, plates, or other fixtures from the trim.
- Fill any holes, cracks, or damaged areas in the trim with wood filler and let dry completely.
- Begin sanding with 80-100 grit to remove existing finishes; then work up to 220 grit for a smooth uniform surface.
- Always sand following the grain direction moving methodically across the surface.
- Apply firm, even pressure but avoid over-pressing in any spot.
- Overlap sanding strokes for consistent results.
- Frequently wipe away dust and debris with a tack cloth to prevent buildup.
- Continue sanding until you achieve a smooth, matte finish.
- Clean sanded surfaces thoroughly before painting.
Following these key steps will make your trim sanding project fast and effective.
Conclusion
Prepping trim with proper sanding is critical for achieving great painted results. Investing in the right tools like hand blocks, power sanders, and an assortment of fresh grits will make the job easier. Remember to always sand with the grain, overlap strokes, and clean as you go. Applying the proper techniques will help you efficiently smooth surfaces for pain-free painting. Follow the checklist above to guarantee your trim sanding project goes as smoothly as your finished trim.