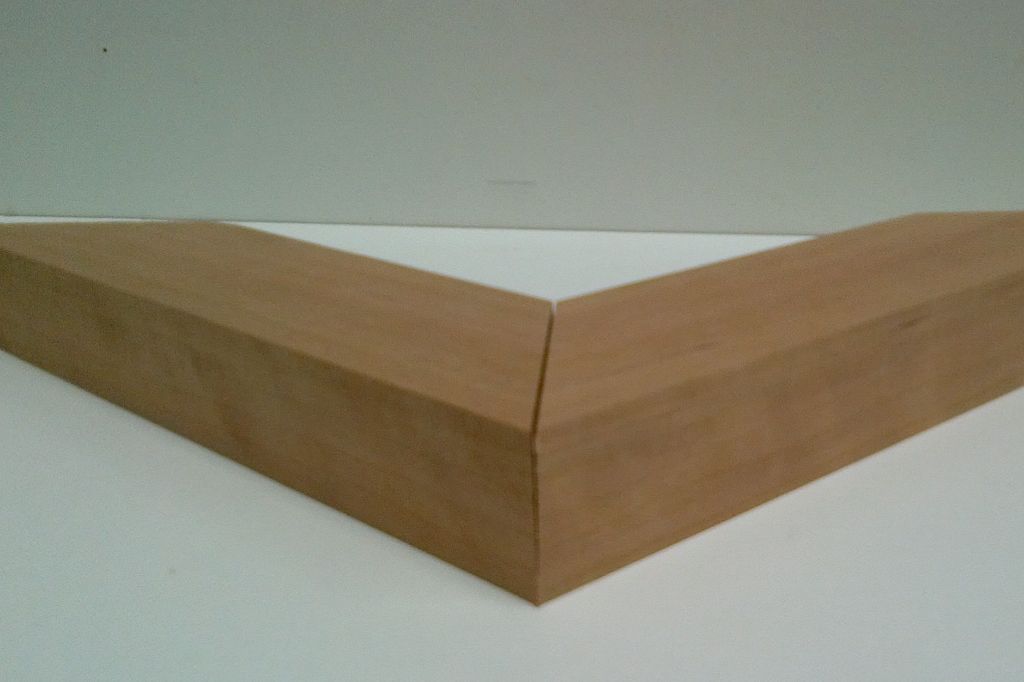
The joint made by cutting 45 degree angles is called a miter joint. Miter joints are a type of woodworking joint formed by bevel cuts. When two pieces are cut at 45 degree angles and joined, they form a 90 degree corner. Miter joints are commonly used to frame pictures, build door frames, make molding transitions, and other trim work.
Page Contents
What is a miter joint?
A miter joint is a joint made by beveling two pieces of material, usually wood, at a 45 degree angle to form a corner. The two beveled ends are joined together to make a neat 90 degree angle. Miter joints allow for crisp, clean corners that appear seamless.
Miter joints get their name from a miter box. A miter box is a guide that holds a saw at the proper 45 degree angle to make the angled end cuts needed for a miter joint. Using a miter box ensures the bevel cuts are made with precision and consistency.
Other names for a miter joint
A miter joint may also be referred to by other names:
- Miter corner
- Picture frame joint
- Angled joint
- Beveled joint
But miter joint is the most common term used to describe this type of 45 degree joining cut.
Uses for miter joints
Miter joints have many useful applications in woodworking. Here are some of the most common uses for miter joints:
Picture frames
One of the most popular uses for miter joints is making picture frames. All four corners of a picture frame are miter joints, with the 45 degree beveled ends joining to make clean 90 degree corners.
Door and window trim
Miter joints are ideal for joining door and window trim and molding. Using angled miter joints allows the trim to seamlessly fit into the 90 degree corners around doors and windows.
Crown molding
Miter joints enable crown molding to fit smoothly into each corner. The two adjoining pieces are cut with complementary bevel angles that join cleanly.
Furniture
Miter joints can be used in making furniture frames. The joints provide an elegant look and allow for strong 90 degree connections.
Table edges
Miter joints make clean finished edges when joining the ends of table tops or other flat surfaces.
Advantages of miter joints
There are several advantages that make miter joints a useful woodworking joint:
Neat appearance
Miter joints joined tightly together appear as one continuous piece with a crisp corner. This gives projects a polished, high-quality look.
Strong 90 degree angle
Miter joints form an exact 90 degree corner, providing strength and stability to connected pieces.
Efficient use of material
Miter joints minimize waste since the beveled angle allows two pieces to come together at the corner without overlapping. Almost all of each piece of stock gets used.
Allows variation in material
Miter joints can join two different materials, colors, or textures. For example, a wood frame with mitered corners can have one side made of walnut and the adjoining side of maple.
Cutting a basic miter joint
Cutting the angles for a basic miter joint is easy with the right tools and a few simple steps:
Materials
- Miter saw or miter box
- Wood stock
- Cutting blade
- Sandpaper
- Wood glue
Steps
- Cut the wood stock to the desired length using a miter saw, chop saw, or handsaw.
- Set the miter saw or miter box blade to 45 degrees.
- Cut one end of each piece with a 45 degree bevel.
- Flip one piece upside down so the angles align to form a 90 degree corner.
- Sand the edges lightly to ensure a tight fit.
- Apply wood glue to both angled ends.
- Join the two pieces with firm pressure.
- Allow the glue to dry as directed before handling.
In just a few easy cuts, you can create a clean and sturdy miter joint corner.
Variations of miter joints
While the basic miter joint forms a 90 degree angle, there are several variations to create different angle connections:
60 degree miter
Cutting the ends at 60 degrees instead of 45 degrees allows three pieces to come together to form a three-sided box shape.
22.5 degree miter
Cutting the bevels at 22.5 degrees enables eight frame pieces to fit into a full 360 degree octagonal shape.
Compound miter
A compound miter has two angled cuts – one across the thickness and one along the width – allowing pieces to fit together at any desired angle.
Double miter
A double miter joint has two intersecting 45 degree bevels, providing more gluing surface for a stronger connection.
Tips for tight miter joints
Well-fitted miter joints require precision cutting and proper technique. Here are some tips for getting tight-fitting miter joints:
Use a miter saw
A power miter saw will provide the most accurate 45 degree cuts. Be sure the blade is set exactly at a 45 degree bevel angle.
Use a stop block
Clamp a stop block to your saw table to ensure all pieces are cut to exactly the same length.
Cut test pieces
Check for a tight fit by cutting scrap pieces. Adjust the saw angle if there are any gaps in the joint.
Use a filler
Fill any small gaps with wood filler before gluing to create an invisible joint.
Clamp securely
Use clamps to apply firm, even pressure while the glue dries for the strongest bond.
Make minor sanding adjustments
Lightly sand a joint that doesn’t close tightly for a custom fit.
Common problems with miter joints
Miter joints require precision to get clean, tight corners. Here are some of the common problems that can occur:
Gaps in the joint
Gaps usually mean the cuts are not precisely 45 degrees. A small gap can be filled but a large gap means recutting one or both pieces.
Pieces not meeting flush
If the ends don’t meet evenly, the lengths may be mismatched. Use a stop block to ensure uniform length.
Loose joint
Without enough glue or clamping pressure, the joint may be weak and loose. Reapply using more glue and sturdy clamping.
Wood splice
If wood fibers are still connecting the corners, sand or plane the ends until just clean wood touches.
Misaligned angles
One bevel edge cut at a slightly different angle will leave a stepped joint. Cut new ends at the correct 45 degree bevel.
Miter joint alternatives
While miter joints are ideal for many situations, other joints may work better in certain cases:
Butt joints
Butt joints are simpler to cut but require more precision. They work for lightweight frames.
Rabbet joints
Rabbet joints form a stronger connection but involve cutting a rabbet notch into one piece to receive the other.
Dovetail joints
Dovetail joints are highly decorative but require skilled hand-cutting of interlocking fingers.
Biscuit joints
Biscuit joints use football-shaped biscuits for alignment. They add strength but allow slight movement.
Pocket hole joints
Pocket holes conceal the screw joinery for a clean look. But they require access to the joint back.
Conclusion
Whether making picture frames, molding, or building furniture, the miter joint is an essential woodworking technique for assembling corners. Cut properly using a miter saw, the miter joint forms clean, tight, beautiful corners. With a little practice and finesse, you can master the miter joint to take your wood projects to the next level.
