Crown molding is an excellent way to add style and elegance to any room. When installing crown molding on cabinets, there are a few factors to consider in order to choose the right type of molding for your space. The size and height of the room, the cabinetry style, and your overall design aesthetic will all impact the best crown molding option. In this article, we’ll go over the different types of crown molding profiles and materials to help you select the perfect molding to give your kitchen or bathroom cabinets a custom, built-in look.
Page Contents
- 1 What is crown molding?
- 2 Why should you install crown molding on cabinets?
- 3 Factors that impact the crown molding choice
- 4 Types of Crown Molding
- 5 How to choose the right crown molding
- 6 How Much Crown Molding Do I Need?
- 7 How Much Does Crown Molding Cost?
- 8 How to Install Crown Molding on Cabinets
- 9 Mistakes to Avoid When Installing Crown Molding on Cabinets
- 10 Interior Design Tips for Crown Molding
- 11 FAQs
- 12 Conclusion
What is crown molding?
Crown molding refers to decorative trim that is installed where the wall meets the ceiling. It serves both a functional and aesthetic purpose. Functionally, it covers the seam between the wall and ceiling, creating a smooth transition. Aesthetically, it adds visual interest, depth and architectural detail.
Crown molding comes in different shapes and sizes, referred to as profiles. The profile affects the overall look and feel. More ornate, curved profiles create an elegant, formal look. Simple, straight profiles have a more casual, transitional feel. The profile you choose is purely based on the aesthetic you want to achieve.
Why should you install crown molding on cabinets?
Installing crown molding on top of your kitchen or bathroom cabinets serves multiple purposes:
- It creates a custom, built-in look by seamlessly integrating the cabinets with the ceiling.
- It conceals the point where the cabinet tops meet the ceiling, creating a streamlined appearance.
- It elegantly frames the cabinetry, drawing the eye upwards and making the space feel more expansive.
- It adds visual interest, depth and architectural detail.
- It enables you to layer moldings for a more customized, high-end look.
Crown molding transforms simple cabinetry into elegant, custom millwork. It takes the kitchen or bathroom from basic to bold.
Factors that impact the crown molding choice
There are several factors that will influence the best type of crown molding for your cabinetry:
Room size and height
The size and proportions of the room will impact the size of the crown molding. Molding that is too small can get lost in a large, high-ceilinged room. Molding that is oversized can feel heavy and overwhelming in a small room with standard 8’ ceilings.
As a general rule of thumb:
- Smaller rooms can use 3-4” crown molding
- Standard sized rooms look best with 5-7” crown molding
- Larger rooms need 8-10” molding for proper scale and presence
Cabinetry style
You’ll want to choose a crown molding profile that complements the door style of your cabinets. For example, contemporary style cabinets with flat panel doors would pair well with a simple crown profile. Traditional cabinets with raised panel doors call for a more ornate crown molding.
Design style
Formal spaces and elegant cabinetry demand dramatic crown molding, like intricate layered moldings. Casual, contemporary spaces suit basic, single piece molding profiles. Make sure to take the overall design style into consideration.
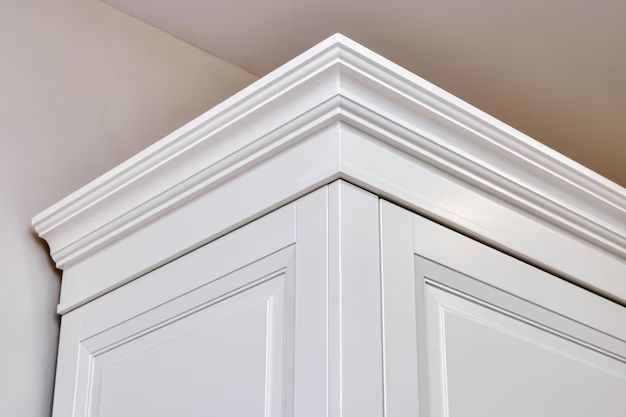
Types of Crown Molding
There are several types of crown molding, categorized by the profile shape and size. The main options include:
Decorative Crown Molding
Decorative crown, also called “built-up” crown, refers to multi-piece molding. This is created by layering several trim pieces to create an intricate, custom look. Components can include the crown itself, plus dental molding, rope molding, bed molding and more.
The possibilities are endless when mixing and matching molding profiles and sizes. Decorative crown is the most elegant, formal option perfect for palatial spaces.
Ogee Crown Molding
Ogee crown has an “S” shaped profile, combining both concave and convex curves. It includes an upper outward curve and a lower inward curve. This profile has a formal, ornate aesthetic well-suited for traditional interiors.
Crosshead Crown Molding
Crosshead molding consists of two identical convex curves meeting at a point, resembling an upside down “V”. It has a simple, clean-lined look that fits with transitional and contemporary style rooms.
Manchester Crown Molding
This crown molding has a stepped profile, with an upper convex curve that transitions to a concave lower curve via a short straight line. Manchester crown has a somewhat angular look with both formal and casual appeal.
Beaded Crown Molding
Beaded crown features a small, half-round convex shape on the bottom where it meets the cabinet tops. This adds a subtle embellishment and a sense of depth. The beaded shape can soften an otherwise plain molding profile.
Polyurethane Crown Molding
Polyurethane molding is typically used for more intricate styles that would be difficult to carve from wood. The polymer material makes it easy to mass produce highly decorative profiles. Polyurethane is denser than wood and less prone to scratches, dents and moisture damage. However, it does not have the same richness or finish options as real wood.
Wood Crown Molding
Wood crown molding provides a genuine, sophisticated look. The most common wood species used are poplar, oak and pine. Pine is the most readily available and affordable option. Poplar is a versatile hardwood thataccepts stain well. Oak has pronounced grain lines for a rustic, traditional effect.
Wood crown can have intricate hand-carved details not possible with polyurethane. It can be stained, painted or left natural. Keep in mind that wood is more prone to swelling and cracking with humidity changes. Proper installation and sealing is key.
How to choose the right crown molding
Follow this process when selecting the perfect crown molding for your cabinetry:
- Measure the room size and ceiling height. Use those dimensions to determine the appropriate molding size based on the scale guidelines provided above.
- Note the cabinet door style. Look for molding profiles that either match or complement the style.
- Decide if you want a single profile or layered, decorative molding. Take your overall design aesthetic into account.
- Browse the common crown profiles to find one that aligns with your ideal style and look.
- Consider the material: polyurethane vs. wood. Factor in your budget, skills and style preferences.
- Purchase a molding sample or small scrap piece to view in the space before fully committing to a profile and material.
Mock up the winning molding option against your cabinetry before purchasing to confirm you’ve selected the perfect crown molding style for your space.
How Much Crown Molding Do I Need?
The amount of crown molding you need depends on the total linear footage to be covered. This is calculated by adding together the lengths of all the walls that will receive crown molding. Use a measuring tape to measure all the walls from end to end.
Most moldings come in 8, 10 or 12-foot lengths. You will need enough lengths of molding to cover the total linear footage, factoring in some extra for cutting mistakes and waste.
To figure the exact number of lengths needed:
- Measure total linear feet needed
- Determine standard molding lengths available (typically 8ft, 10ft or 12ft)
- Divide total linear feet by the standard molding length to get the number of pieces required
- Add 10-15% more lengths to allow for imperfect cuts and mistakes
Having some extra lengths of molding available ensures you don’t come up short on installation day. Unused stock can be returned or used for future projects.
How Much Does Crown Molding Cost?
Crown molding costs between $2 – $10 per linear foot, depending on the material and complexity of the profile.
- Polyurethane Foam: $2-$5 per linear foot
- Pine Wood: $3-$6 per linear foot
- Poplar Wood: $4-$8 per linear foot
- Oak Wood: $7-$10 per linear foot
- Layered/Decorative: $10+ per linear foot
More detailed or layered crown profiles cost more due to intricate carvings and multiple pieces. The tradeoff is a richer, customized aesthetic.
Wood species affects the price as well. Oak is most expensive, followed by poplar and pine. The regional availability of different wood types also impacts cost.
In addition to materials, factor in any delivery fees, taxes, and installation costs if you plan to hire a carpenter. Installed molding runs $15-$30 per linear foot.
Overall, expect to spend $500-$2000 to add crown molding to standard 10×10 kitchen. Larger, high-end kitchens with premium molding selections can cost upward of $5000.
How to Install Crown Molding on Cabinets
Installing crown molding on your kitchen or bathroom cabinets allows you to transform them with elegance and custom detail. Here is an overview of the installation process:
Prep the Area
– Remove existing dust and grease from the cabinet tops and walls with cleaning spray and rags.
– Fill any gaps or imperfections in the walls and ceiling line with drywall compound to ensure a smooth mounting surface. Sand smooth.
Measure and Cut Molding
– Measure each wall section and cut molding lengths accordingly with a miter saw allowing for 45 degree angle cuts.
– For inside corners, cut the adjoining molding ends at 45 degree angles so they join attractively at the corner.
– Cut molding sections longer than needed, then fine tune for a tight fit directly against the cabinets.
Install Molding
– Run a bead of construction adhesive along the cabinet tops and ceiling line.
– Hold molding in place with finishing nails driven through the top edge into the ceiling. Set nails and fill holes.
– In corners, use L-brackets to join the two mitered ends for added stability and seamless transitions.
– Use wood filler to patch gaps or imperfections between moldings and surfaces. Sand smooth.
Caulk and Paint
– Apply painter’s caulk along all seams and nail holes, smoothing the bead with a moist fingertip. Allow to dry completely.
– Carefully paint or finish the molding to match the cabinets and ceiling. Apply two coats allowing proper dry time between coats.
And that’s it – you now have beautiful, custom crown molding that elevates your cabinetry to new sophisticated heights.
Mistakes to Avoid When Installing Crown Molding on Cabinets
While installing crown molding on top of kitchen or bathroom cabinets can give them a custom, built-in look, there are some mistakes to avoid:
- Using molding that is out of scale for the room. Make sure to size it appropriately based on the space dimensions.
- Failing to fully secure the molding. Use plenty of nails and adhesive for a permanent bond.
- Not filling gaps. Any imperfections between the molding and wall or ceiling will be accented once caulk and paint is applied.
- Cheaping out on materials. Quality wood or polyurethane molding will look markedly better than discount products.
- Ignoring the junction between sections. Use L-brackets or other supports at seams for stability.
- Inadequate caulking. Take time to smoothly caulk every seam for a polished finish.
- Installing while cabinets are full. Removing cabinet contents will make accessing the tops much easier.
- Not allowing proper drying time between coats of finish. Rushing the finish can ruin the final look.
Avoid these issues upfront by carefully prepping, measuring twice, securing thoroughly and applying finishes patiently. Take time with each installation step for long-lasting, stunning results.
Interior Design Tips for Crown Molding
Here are some top design tips for selecting and incorporating crown molding into your kitchen or bathroom beautifully:
- Echo the style. Choose a crown profile design that complements your cabinet door style for cohesion.
- Size up. Select a molding size proportional to the room dimensions. Too small gets lost. Too large overwhelms.
- Layer on luxury. Stack molding profiles to create dimensional, elegant interest.
- Lighten up. For a bright and airy look, use white or lightly stained molding.
- Go bold. Make a dramatic statement with dark stained or painted molding contrasting the cabinet color.
- Incorporate texture. Look for molding with carved details for tactile visual appeal.
- Accent with metal. A coordinating metal inlay band along the ceiling line adds a punch of shine.
- Play with paint. Use a complementing color on the molding to make it pop.
By thoughtfully selecting and positioning your crown molding, you can infuse any kitchen or bath with a designer look and custom feel.
FAQs
What is the most popular crown molding?
Ogee is likely the most popular and common crown molding profile. Its elegant S shape melds both concave and convex lines for visual interest. The gradual curves suit a wide range of cabinet styles from traditional to transitional.
Should crown molding match cabinets?
Crown molding does not necessarily have to match the cabinet finish exactly. Contrasting finishes can provide design interest. However, the crown should coordinate in terms of both color and style. A mismatch will look disjointed.
What sheen should I use on crown molding?
Crown molding should be finished to match the cabinetry finish. If your cabinets have an eggshell sheen, the crown should as well. A glossy crown against flat cabinetry would look out of sync. Matching the sheen helps unify the elements.
Can I install crown molding myself?
With careful planning and some carpentry skill, crown molding can definitely be installed DIY-style. However, it’s a somewhat advanced project. Poor cuts or inadequate securing can ruin the final look. Many homeowners prefer hiring a professional carpenter for flawless results.
Does crown molding go to the ceiling or cabinets?
Proper crown molding installation secures the molding to both the ceiling and the cabinet top. Nails into the ceiling hold it place. Adhesive along the cabinet tops keeps the bottom seam tight. This prevents sagging and creates a custom, built-in look.
Conclusion
The perfect crown molding selection elegantly frames your kitchen or bathroom cabinets while reflecting your unique style. Evaluate the room size, cabinetry style and overall aesthetic you want to achieve. Then thoughtfully choose a crown profile and material that fits the space beautifully. With proper scaling, securing and finishing, you can add a personal designer touch with stunning crown molding.