When installing joist hangers, using nails of the proper length is crucial for ensuring the structural integrity of the finished product. Joist hangers provide a strong connection point between joists and headers or beams in floor and ceiling framing. Nails act as the fasteners to hold the joist hanger and connected wood members firmly together. If the nails are too short, they won’t have enough grip to properly secure the connection. Conversely, excessively long nails can split the lumber. So what is the ideal nail length for joist hangers? Read on for an in-depth look at how to determine the proper joist hanger nail size based on various factors.
Page Contents
Joist Hanger Basics
Before getting into appropriate nail lengths, it helps to understand what exactly joist hangers are and how they work. A joist hanger is a steel bracket with sides and nail holes that allow joists to be hung from beams or headers. The vertical sides of the joist hanger envelope the joist while the horizontal nail holes attach the unit to the header. This creates a strong 90 degree connection between the perpendicular members.
Joist hangers are commonly used when:
– Framing floors to connect joists to headers and beams
– Framing ceilings to connect joists to ledger boards
– Reinforcing existing framing by sistering new joists
Proper installation of joist hangers requires:
– Hanger is compatible with joist size and spacing
– Joist is centered within the hanger
– Correct nails are driven through all nail hole locations
Using the manufacturer specified nails is key for the joist hanger to achieve its listed load capacity.
Joist Hanger Nail Type
Joist hanger nails are almost always carbon steel. Stainless steel or coated nails are recommended for exterior applications or wet environments only. Nails should meet ASTM F1667 specifications.
The nail head shape is also important. Nails with round heads allow the head to seat firmly against the metal hanger. Some other types of nails like clips or sunk-head nails can work with certain joist hangers, but they may not provide the same holding power. Always check that the nail head shape is approved for use with the specific joist hanger.
Joist Hanger Nail Length Factors
To achieve appropriate nail penetration and strength, several factors determine what nail length is required or permitted:
Joist Size
– The dimensions of the joist or rafter affect nail length needs
– Nails must be long enough to extend at least 1⁄2” through the lumber being hung
– Excessive nail length can split wider joists
Number of Connected Members
– More members require longer nails for penetration
– Typically need to penetrate joist and header for floors
– May also need to penetrate decking, blocking, etc.
Member Thicknesses
– Nail length depends on thickness of:
– Joist
– Header
– Ledger
– Decking
– Additional members
– Must account for all material thicknesses
Joist Hanger Design
– Some hangers have multiple nail holes at different heights
– Allows use with varying joist thicknesses
– Nails should be installed in appropriate rows for joist depth
Manufacturer Specifications
– Joist hanger manufacturer provides nail sizing
– May show minimum and maximum nail lengths
– Always follow the approved nail range
Typical Joist Hanger Nail Lengths
While the nail length can vary considerably based on all the previous factors, here are some typical lengths used:
Ledger Mount with 2x Joist:
– 1-1/2” to 2-1/2” nails
Joist Mount with 2x Joist:
– 2-1/2” to 3” nails
Heavy Duty Joist Hangers:
– Up to 3-1/2” nails
Again, these are just general guidelines. Refer to the manufacturer’s specifications to determine the proper nail length range for each application.
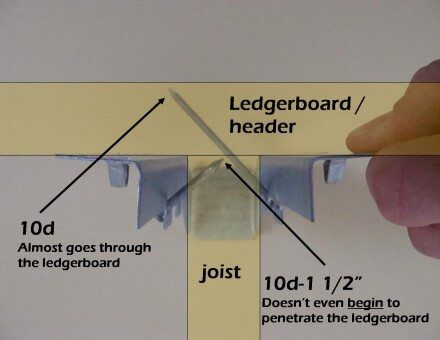
Determining Minimum Nail Length
Figuring out the minimum nail length needed for a certain joist hanger installation is straightforward:
1. Determine the total thickness of all members the nail must penetrate. For floors, this is typically the joist plus header.
2. Add 1/2” to allow for adequate through penetration of the nail point.
3. Round up to the next common nail length.
For example, if you have 2×8 floor joists and a double 2×8 header:
1. Joist depth: 7-1/4”
Header depth: 3-1/2” x 2 = 7”
Total thickness: 7-1/4” + 7” = 14-1/4”
2. Add 1/2”
Minimum length = 14-3/4″
3. Round up to the next common length: **15″**
So for this example with 2×8 lumber, a 15″ nail would be the minimum required length.
Maximum Nail Length
You also need to watch out for using excessively long nails with joist hangers. Nails that are too long can split the wood when driven in fully.
As a general guideline, maximum nail length should be limited to:
– **5 times** the joist or rafter thickness for softwoods like pine
– **7 times** the thickness for hardwoods like oak
For example, with 2×8 pine joists:
1. Joist thickness = 1-1/2″
2. Maximum length for 2×8 = 1-1/2″ x 5 = **7-1/2″**
Any nails longer than 7-1/2″ risk splitting the joist.
Always consult the joist hanger manufacturer’s recommendations to confirm the allowable nail size range. Never exceed the maximum permitted length.
Joist Hanger Nail Length Tables
Many joist hanger manufacturers include nail length tables in their catalogs or websites. These convenient tables take the guesswork out of selecting the proper nail size.
Simply identify your joist size and header material to find the minimum and maximum nail length that should be used.
Here is an example nail length table:
| Joist Size | Header Material | Minimum Nail Length | Maximum Nail Length |
|---|---|---|---|
| 2×6 | 2x or LVL | 1-1/2″ | 3-1/2″ |
| 2×8 | 2x or LVL | 2-1/2″ | 4-1/2″ |
| 2×10 | 2x or LVL | 3″ | 5″ |
| 2×12 | 2x or LVL | 3-1/2″ | 5-1/2″ |
Refer to your specific joist hanger manufacturer’s literature for the approved nail size ranges. Never go outside the published values.
Matching Nail Size to Holes
Another key factor is making sure the nail shank diameter matches the joist hanger nail holes. Nails that are too skinny won’t have adequate lateral resistance. Overly large nails won’t fit through the holes at all.
Joist hanger manufacturers may specify using either:
– **0.148″ nails:** Fits #9 nail holes
– **0.162″ nails**: Fits #10 nail holes
Again, consult the joist hanger documentation to determine which nail diameter is approved for that product.
As a general rule of thumb, nail diameter should match the approximate nail hole diameter. Don’t try to force mismatched nail sizes through the wrong holes.
Joist Hanger Nail Quantity
Finally, be sure to drive the full quantity of nails that are called out in the joist hanger directions. Nails must be installed in all specified nail holes to achieve the rated strength. Leaving holes empty negates the listed capacity of the joist hanger.
Common nail spacing includes:
– 2 nails at each end
– 1 nail about every 3″ along the length
Consult the manufacturer’s nail schedule to confirm the required layout pattern and total number of nails for that particular joist hanger and installation.
Conclusion
Selecting the proper nail length is crucial for proper joist hanger connections. The nails must fully penetrate the lumber while avoiding excess length that could split the wood. Consider the thickness of connected members, joist size, joist hanger design, and manufacturer specifications when determining the appropriate nail length range. Following the recommendations will result in securely supported joists. For any ambiguous situations, don’t hesitate to contact the joist hanger company’s technical support line to confirm suitable nail sizing. Taking the time to use the right length joist hanger nails will result in robust framing that withstands the test of time.
