Page Contents
Bathroom Mould Overview
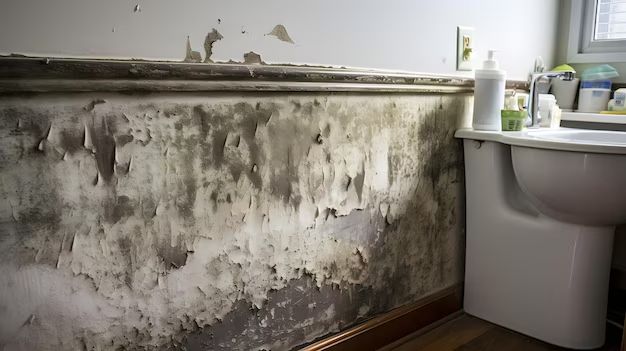
Mould growth is a common issue in bathrooms due to the warm, humid conditions that are ideal for mould to thrive. Mould can start growing within 24-48 hours in damp environments and spreads quickly if not treated properly. It appears as black, green, or grey spots on surfaces like walls, ceilings, tiles, grout, and caulking. Prolonged exposure to mould spores can cause various health issues like allergies, asthma, and other respiratory problems. Therefore, it is essential to control bathroom mould right from the start by using the right type of paints that can resist or prevent mould growth.
Causes of Mould in Bathrooms
There are several factors that contribute to mould growth in bathrooms:
– Humidity – Bathrooms have a lot of moisture in the air from hot showers, steam, and wet surfaces. High humidity provides the perfect condition for mould to thrive.
– Lack of ventilation – Inadequate ventilation allows moisture to accumulate and condense on surfaces. Proper ventilation is required to remove humid air and prevent condensation.
– Leaks and flooding – Leaky plumbing, overflowing tubs/sinks, and floods can cause water damage and dampness. Any water-logged areas easily allow mould colonies to grow.
– Temperature – Warm and fluctuating temperatures accelerate mould growth. Bathrooms tend to be warmer than other rooms.
– Surface materials – Porous surfaces like drywall, wallpaper, wood, and grout are more prone to mould growth as they absorb and retain moisture.
– Lack of cleaning/maintenance – Buildup of soap scum, dirt, mildew stains etc. also enables mould growth if not cleaned properly.
Preventing Mould Growth in Bathrooms
Here are some ways to prevent mould growth in bathrooms:
– Maintain proper ventilation using exhaust fans, open windows, and dehumidifiers.
– Quickly fix any leaks and repair water damage.
– Clean and disinfect all surfaces regularly to control mould and mildew.
– Limit excess moisture by using shower curtains, wiping down surfaces after use etc.
– Apply sealants on tiles, grout, sinks, tubs etc. to prevent water absorption.
– Insulate cold water pipes to reduce condensation.
– Keep the bathroom temperature controlled and avoid extreme temperature fluctuations.
– Use mould resistant paints, primers and caulks when renovating.
Choosing the Right Bathroom Paint
When selecting paint for humidity-prone bathrooms, look for the following characteristics:
– Mould/Mildew Resistant – Choose paints specially formulated to prevent mould and mildew growth. They contain EPA registered biocides that inhibit mould.
– Moisture Resistant – Coatings that repel water prevent dampness leading to peeling and growth of mould.
– High Hiding – Paints with great coverage hide stains easily. They are also more opaque and less likely to allow mould to show through.
– Scrubbable & Washable – High-quality scrubbable paints with stain resistance allow cleaning walls easily without damaging the paint.
– Low VOC – Low VOC (Volatile Organic Compounds) paints contain fewer chemicals and solvents that deteriorate paint over time.
– Anti-Microbial – Paints with anti-microbial properties prevent the spread of mould, bacteria and other microbes.
– Primer – Primer seals surfaces and provides extra protection against moisture and growth of mould.
Top Paint Options for Bathrooms
Here are some good paint options for bathrooms prone to humidity and mould:
1. Zinsser Perma-White Mold & Mildew Proof Interior Paint
– 100% acrylic latex formula
– Contains EPA registered biocide to resist mould & mildew
– High hiding capacity and scratch resistant
– Low VOC and low odor
– Cleans easily with soap and water
2. Rust-Oleum Zinsser Bulls Eye 1-2-3 Water-Based Interior and Exterior Primer
– High hiding stain-blocking primer
– Seals porous surfaces and provides mold resistance
– Bonds tightly and reduces water absorption
– High hiding capacity obscures stains
– Use under latex and oil paints
3. Benjamin Moore MoorArmor Bath & Spa Paint
– 100% acrylic paint with mold, mildew and stain resistance
– Formulated for high humidity areas
– Withstands frequent washing and scrubbing
– Low VOC, low odor and spatter resistant
– Available in matte, eggshell and pearl sheen
4. BEHR Premium Plus Ultra Interior Paint with Antimicrobial-Mildew Resistant Technology
– Paint plus primer qualities with stain-blocking
– Contains antimicrobial agents that prevent mould and mildew
– Provides moisture and humidity resistance
– Scrubbable, durable, washable finish
– Advanced uv protection against fading
5. KILZ Interior/Exterior Enamel Porch and Patio Floor Paint
– Low-luster acrylic/latex formula
– Resists mildew growth on exterior surfaces
– Excellent adhesion and durability
– Soap and water cleanup
– Use on porous indoor and outdoor surfaces
6. PPG Paints Seal Grip Acrylic Universal Primer
– Interior/exterior 100% acrylic water-based primer
– Bonds firmly to glossy and hard to paint surfaces
– Blocks stains, seals porous surfaces and provides moisture resistance
– Use under latex and oil-based paints
– Low VOC and fast drying
Where to Use Bathroom Paints?
Anti-mould bathroom paints should be applied to the following areas:
– Walls – Use mould resistant paint on all bathroom walls and surfaces prone to moisture damage and mould growth.
– Ceilings – Due to humidity, bathroom ceilings are also susceptible to peeling paint and mould.
– Behind/around fixtures – Paint behind sinks, toilets, tubs etc. as mould forms in hidden damp crevices.
– Tile grout – Use specialized anti-mould grout paints to protect discolored or moldy grout lines.
– Window sills/frames – Prevent mould growth on bathroom windows with antimicrobial paints.
– Doors/trims – High condensation on bathroom doors and trims causes paint to peel and mould.
– Vents/fans – Use mould resistant paint around exhaust fan vent covers prone to moisture accumulation.
How to Prepare Surfaces and Apply Paint?
Follow these steps to correctly prepare surfaces and apply bathroom paint:
– Clean surfaces thoroughly – Scrub walls, ceiling etc. with warm soapy water and rinse off residue. Allow to dry completely.
– Fix leaks/damage – Repair any leaky plumbing, holes, cracks etc. that allow moisture.
– Sand glossy areas – For better adhesion, lightly sand shiny painted areas and wipe clean.
– Treat existing mould – If there is existing mould growth, clean with bleach solution. Allow to dry.
– Fill holes/cracks – Use spackle or caulk to patch holes, cracks to prevent water seepage.
– Use primer – Prime all surfaces with a quality stain-blocking primer for better mould prevention.
– Apply paint coats – Use a roller, brush or sprayer to apply 2-3 thin uniform coats allowing proper drying between coats.
– Maintain ventilation – While painting and drying, turn on exhaust fans and open windows for airflow.
– Clean tools – Once painting is complete, wash brushes and other tools with soap and water.
Conclusion
Preventing bathroom mould involves controlling humidity and moisture while using the right types of paints and prep work. Choosing interior paints with mold/mildew resistance ensures any existing mould growth is inhibited and new mould is less likely to form. Using primers provides an added layer of protection. Proper surface prep also enhances paint adhesion for long-lasting results. Following application best practices like maintaining ventilation further helps the paintwork. Investing in good quality antimicrobial bathroom paints goes a long way in preventing pesky mould issues.