Carving pumpkins for Halloween is a fun tradition that allows you to get creative and make unique designs. While carving by hand with a knife is classic, power tools allow you to carve more intricate and detailed pumpkins. Power tools that are safe and effective for pumpkin carving include drills, rotary tools, jigsaws, scroll saws, and some sanders. Using power tools allows you to carve faster and more precisely than manual tools.
Page Contents
- 1 What tools do you need for carving pumpkins?
- 2 Can you use a drill for pumpkin carving?
- 3 What rotary tool bits work best?
- 4 What designs can you create with a jigsaw?
- 5 What designs can you make with a scroll saw?
- 6 What sander types can you use on pumpkins?
- 7 What safety tips should you follow?
- 8 What are some ideas for power tool pumpkin carving?
- 9 Conclusion
What tools do you need for carving pumpkins?
The most basic tool that every pumpkin carver needs is a sharp knife. A sturdy, sharp knife allows you to cut shapes and designs into the rind of the pumpkin. Longer knives give you better leverage for sawing through tough parts. A serrated knife can help saw through thick pumpkin walls.
Beyond a basic knife, power tools open up many possibilities for intricate carving. Here are some common power tools used in pumpkin carving:
- Drills – Use drill bits of different sizes to carve holes and indentations
- Rotary tools – Dremel or other rotary tools allow detail work with different tips
- Jigsaws – Cut shapes and silhouettes out of the pumpkin rind
- Scroll saws – Create delicate, lacy pumpkin designs
- Sanders – Help smooth and shapepumpkin surfaces
These power tools require electricity, so make sure you will have access to power when carving or use battery-powered versions. Safety gear like gloves and eye protection is also important when using power tools.
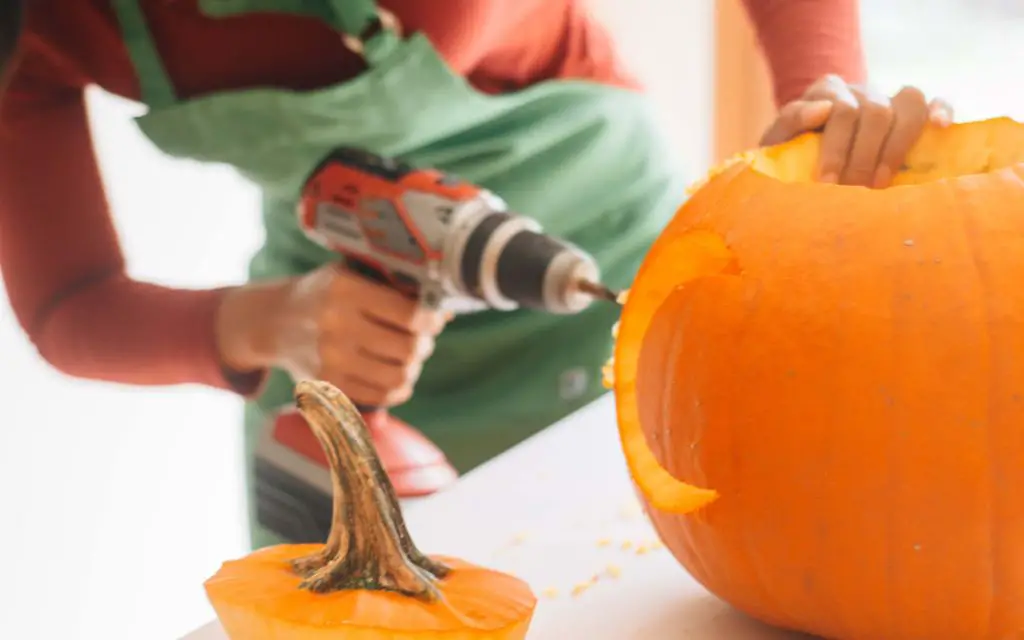
Can you use a drill for pumpkin carving?
Using a drill is an excellent way to enhance your pumpkin carving. A drill allows you to easily make holes and indented areas for added detail. Here are some tips for using a drill when carving pumpkins:
- Use various sized drill bits – Smaller bits make refined details like eyes and mouths. Larger bits quickly remove pumpkin flesh.
- Try different drill tips – Spade bits cut wide, spoon-shaped holes. Forstner bits create flat-bottomed holes.
- Control depth – Use a drill stop or wrap tape around the bit to control hole depth.
- Draw guide lines first – Lightly mark your design on the pumpkin to follow while drilling.
- Go slowly – Let the drill do the work, don’t force it through the pumpkin.
Cordless drills offer the most convenience and mobility while carving. A variable speed corded drill also works well. Avoid using high torque drills that could damage the pumpkin shell.
What rotary tool bits work best?
Rotary tools like Dremels are ideal for detailed pumpkin carving using different tips and bits. Here are some of the best Dremel bits and tips for different effects:
| Bit/Tip | Use |
|---|---|
| Engraving tip | Fine line detailing, etching |
| Carving tip | Precision shaping and sculpting |
| Saws | Cutting shapes and slits |
| Grinding stones | Removing flesh and smoothing |
| Sanding bands | Smoothing carved edges and surfaces |
| Cut-off wheels | Cutting slits and openings |
Always pick accessories rated for soft materials like wood or plastic when carving pumpkins. High speeds can quickly overheat and damage the pumpkin, so use slower speeds and gentle pressure.
What designs can you create with a jigsaw?
A jigsaw allows you to cut intricate shaped right out of a pumpkin rind. With an adjustable jigsaw blade you can create clean curves and details. Some designs well-suited for jigsaw carving include:
- Portraits – Cut a detailed silhouette of a face profile.
- Intricate shapes – Create patterns of stars, zigzags, florals.
- Splatter effects – Cut random “splatters” into a pumpkin.
- Scene cutouts – Cut a window scene with foreground and background elements.
- Stencils – Use a jigsaw to cut stencils from wood/plastic to trace onto pumpkins.
A coping saw is another option for intricate jigsaw-style cutting. Whether using a coping saw or jigsaw, go slow on curves and interior cutouts. Turn off the jigsaw before removing or reinserting the blade.
What designs can you make with a scroll saw?
A scroll saw is ideal for making lace-like fretwork designs in pumpkins. The thin, pliable scroll saw blade can make intricate, fretted cuts that would be impossible with a jigsaw. Some creative ways to use a scroll saw include:
- Lacy borders – Cut lacy edges around faces, names, or designs.
- Fretwork – Cut lattice or geometric fretwork patterns.
- Portraits – Create fretted silhouette portraits.
- Faux stained glass – Mimic colorful stained glass patterns in the pumpkin.
- Holiday themes – Make snowflake, bat, or other holiday cutouts.
Always keep hands and fingers clear of the scroll saw blade. Relief cuts let the blade turn corners smoothly. Periodically back out the blade to clear pumpkin debris.
What sander types can you use on pumpkins?
Using sanders helps refine and add artistic flair to carved pumpkins. The following sander types work well for different purposes:
| Sander | Use |
|---|---|
| Orbital sander | Smoothing flat surfaces |
| Detail sander | Refining small areas and details |
| Belt sander | Removing flesh and contouring shapes |
| Spindle sander | Shaping and sculpting curves |
Use fine grit sandpaper (120-220 grit range) to keep details crisp. Always sand with the pumpkin grain and use light pressure. Hand sanding also works for finishing touches.
What safety tips should you follow?
Safety should always come first when using power tools for pumpkin carving. Follow these tips to carve safely:
- Use eye protection – Protect your eyes from debris.
- Wear gloves – Guard your hands from cuts and burns.
- Check tools – Ensure bits and blades are secured.
- Unplug when not in use – Don’t leave a running tool unattended.
- Don’t force tools – Let the tool do the work.
- Watch hand placement – Keep hands away from danger zones.
- Work on stable surface – Avoid slipping or tipping.
It’s also smart to keep a first aid kit on hand for minor cuts. Take your time and don’t rush while using power tools. Paying attention is key to staying safe.
What are some ideas for power tool pumpkin carving?
Here are some inspiring ideas that utilize power tools for creative pumpkin carving:
- Haunted house scene – Use a series of different sized drill bits to create a spooky house, trees and moon.
- Intricate portrait – Cut a side-profile silhouette portrait with sharp detail using a rotary tool.
- Splatter pumpkin – Make an eye-catching splatter design using a jigsaw.
- Fretwork geometric – Use a scroll saw to cut geometric fretwork patterns all over a pumpkin.
- Animal portrait – Sculpt a forest animal portrait like an owl, fox or deer using drill and Dremel.
- Faux metal – Use a needle tool to etch a metallic patina effect over a carved design.
The key is choosing tools that best enable the details you want to carve. Simple designs may need only a knife or drill, while complex concepts benefit from rotary tools, jigsaws, scroll saws and sanders. Let your creativity run wild!
Conclusion
Power tools open up exciting possibilities for taking pumpkin carving to the next level. Drills, Dremels, jigsaws, scroll saws and sanders all have specific benefits for different aspects of the process. Following proper safety precautions allows you to utilize these tools for creative and artistic designs. With the right preparation and care, power tools can help you carve a pumpkin masterpiece unlike any other.