During winter, one of the biggest problems homeowners face is dealing with frozen pipes and spigots. When temperatures drop below freezing, any exposed pipes or outdoor spigots can freeze, causing major plumbing issues. So what type of spigot is less likely to freeze in cold weather? There are a few options to consider.
Page Contents
- 1 Frost-Proof Spigots
- 2 Self-Draining Spigots
- 3 Indoor Shut-off Spigots
- 4 Spigot Insulation
- 5 Heated Spigots
- 6 Conclusion
- 7 Frequently Asked Questions
- 8 Outdoor Spigot Options Comparison Table
- 9 Installing Frost-Proof Spigots
- 10 Maintaining Outdoor Spigots
- 11 Preventing Frozen Pipes
- 12 Dealing with Frozen Pipes
- 13 Conclusion
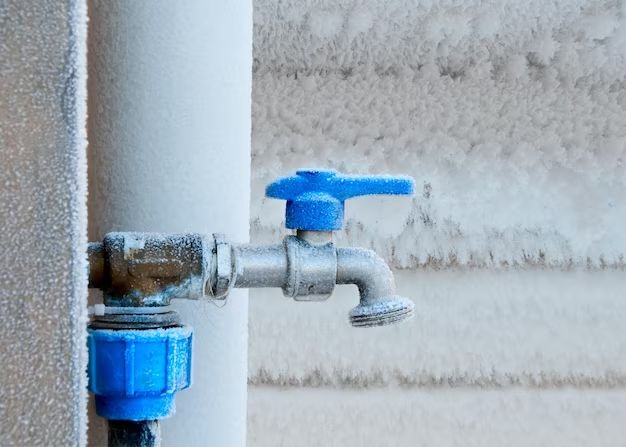
Frost-Proof Spigots
One of the best options for cold climates is a frost-proof spigot. These spigots have a long neck that extends back into the warm area of the house. This design keeps the valve deeper inside the building insulation where it is less vulnerable to freezing temperatures. Here are some key advantages of frost-proof spigots:
- The valve and washer assembly is located 8-12 inches inside the warm space of the wall.
- They are compliant with most plumbing codes for external faucets.
- You don’t have to remember to shut off the water supply before winter.
- They rarely freeze even in sub-zero temperatures.
Frost-proof spigots do have a potential downside in that if the pipe leading to the spigot bursts, it can leak into the wall space undetected. Proper insulation around the pipe can help prevent this. Overall, however, frost-proof designs are one of the most reliable and maintenance-free options for outdoor faucets exposed to freezing weather.
Self-Draining Spigots
Another type of spigot designed to prevent freezing is a self-draining or freeze-resistant spigot. These spigots have a valve placed closer to the front of the spigot. However, they also have a mechanism that allows any standing water to drain from the pipe automatically after being used.
Here are some of the advantages of this style:
- No need to manually drain the pipe before winter.
- The draining mechanism eliminates any trapped water that could freeze.
- Less pipe is exposed to the cold than a frost-proof spigot.
- Less potential for undetected leaks if the pipe bursts.
The main downside is that self-draining spigots typically do need to have the water supply shut off before sustained sub-freezing temperatures. They drain out most of the water, but may still be prone to freezing in extreme cold. Proper installation is also key to making sure the spigot can fully drain after use.
Indoor Shut-off Spigots
For extremely cold climates, another option some homeowners choose is to install the shut-off valve for an outdoor spigot inside the house. This allows you to shut off and drain the spigot before winter. Here are some key points about this method:
- Gives you full control to shut off water and drain the line.
- Spigot can be located closer to the shut-off valve inside.
- Requires opening the wall to access the shut-off valve indoors.
- You must remember to shut off the water before freezing temps arrive.
The downside is that you have to be diligent about shutting off the water ahead of winter and remember to drain any standing water from the spigot. And access to the shut-off requires some minor wall surgery. But in very cold regions, an indoor shut-off provides reliable freeze prevention.
Spigot Insulation
One simple way to help prevent freezing of standard outdoor spigots is to insulate them. Installing foam insulation kits around the pipe and backside of the spigot can provide some extra protection in moderately cold temperatures. Here are the pros and cons:
- Inexpensive protection against light freezing.
- Foam insulation is simple to install.
- May not prevent freezing in extreme cold.
- Insulation can wear off over time.
Insulating spigots is quick and cheap but is not guaranteed protection against sub-zero temperatures. So it works best for areas with milder winters. Be sure to check and replace worn insulation regularly.
Heated Spigots
For the ultimate protection against frozen pipes, some homeowners opt for installing heated spigots. These specialty spigots have electric heating cables or elements built right in to keep them at a temperature above freezing. Key features include:
- Thermostats maintain temperature just above freezing.
- Powered by outdoor-rated electricity.
- Provides reliable freeze protection in extreme cold.
- More complex installation and electrical work.
Heated spigots are the most fail-safe choice but also the most involved to install and operate. The electrical components also increase the spigot cost significantly. This is best reserved for high-end homes in severely cold climates.
Conclusion
Preventing outdoor spigots from freezing in winter takes some planning. The best choice depends on your climate conditions and how much effort you want to put into winter maintenance. Frost-proof and self-draining spigots provide good passive protection. Or you can take active measures like insulating or heating spigots. With the right spigot choice, you can keep your outdoor water flowing all winter long.
Frequently Asked Questions
What is the most freeze-proof outdoor spigot?
The most reliably freeze-proof outdoor spigots are frost-proof models. Their long necks position the valve back inside the insulated house wall. This protects against freezing far better thanexposed valves. Self-draining and indoor shut-off spigots also offer good freeze resistance.
Do I really need a freeze-proof spigot?
It depends on your climate. In milder regions, insulating standard spigots may be enough. But for areas with sustained sub-freezing winter temps, investing in frost-proof or other freeze-resistant designs is highly recommended. This prevents costly, damaging frozen pipe issues.
How do you keep outdoor spigots from freezing in winter?
Here are some tips for keeping outdoor spigots freeze-free:
– Install frost-proof or self-draining spigots that are designed to prevent freezing.
– Insulate outdoor faucets with foam covers.
– Shut off indoor water supply and drain spigots before winter.
– Protect pipes by wrapping them with insulated covers.
– Let spigots drip very slightly during extreme cold.
– Consider installing heated spigots powered by electricity.
Should I shut off outdoor spigots in winter?
With standard outdoor spigots, it’s wise to shut off the water supply indoors and drain any standing water before sustained freezing temps arrive. But frost-proof and self-draining models do not need to be manually shut off or drained. Consult manufacturer guidelines for your specific spigot.
How do you thaw a frozen outdoor spigot?
If you have a frozen spigot, the safest method is using a hair dryer or space heater to gently thaw the pipe. Avoid breaking up ice, which can damage the pipe. Thawing salts and open flames are not recommended. Prevent future freezing by better protecting or replacing the spigot.
Outdoor Spigot Options Comparison Table
| Spigot Type | Freeze Resistance | Maintenance Needed | Installation Requirement |
|---|---|---|---|
| Frost-Proof | Excellent | Minimal | Moderate |
| Self-Draining | Good | Minimal | Moderate |
| Indoor Shut-off | Excellent | Winterization required | Moderate to complex |
| Insulated | Fair | Insulation maintenance | Simple |
| Heated | Excellent | Electricity, thermostat | Complex |
Installing Frost-Proof Spigots
If you’ve decided that a frost-proof spigot is the best choice for your climate and home, here are some tips for properly installing one:
1. Choose an Exterior Wall Location
Pick an outdoor wall location that lines up with accessible indoor plumbing. The spigot pipe will need to penetrate the wall to connect with existing pipes or plumbing fixtures.
2. Check Your Pipe Layout
Confirm that the layout of your home’s water supply pipes allows for connecting a new branch line to the frost-proof spigot location. This may require some adjustments.
3. Turn Off Main Water Supply
Shut off the main water shut-off valve for the home before beginning any installations. Release pressure by opening indoor faucets.
4. Install Wall Penetration Sleeve
Drill a hole through the wall at the desired spigot location. Insert a protective sleeve through the hole that the spigot pipe will fit into.
5. Mount Spigot Base
Attach the back plate of the frost-proof spigot assembly securely to the exterior wall over the sleeve. Use a sealant or caulk around it.
6. Connect Pipe to Spigot
Thread the spigot’s supply pipe through the wall sleeve. Attach it using the coupling nut on the spigot. Position the valve 8-12 inches back from the exterior wall.
7. Connect to Indoor Plumbing
On the interior end, solder or crimp the supply pipe to reach your home’s water lines. Position a shut-off valve indoors.
8. Insulate Pipe Section
Insulate the exposed pipe section that goes through the wall penetration sleeve for extra freeze protection.
9. Test for Leaks
Restore main water supply and test spigot for leaks. Fix any drips and enjoy your new frost-proof outdoor faucet!
Maintaining Outdoor Spigots
To keep your outdoor spigots working reliably for many years, follow these maintenance tips:
Inspect Annually
Check all outdoor spigots at least once a year for problems like leaks, drips, cracked parts or insulation damage. Fix identified issues promptly.
Protect from Freezing
Before winter hits, take appropriate measures to prevent freezing based on the specific spigot type you have installed.
Replace Washers
If a spigot begins to drip or leak around the valve, the rubber washer may need replacing. This is quick and easy DIY fix.
Update Insulation
Check any insulating foam covers or pipe insulation and replace it if the material has degraded over time.
Drain Spigots
For standard spigots, remember to drain any standing water and shut off the indoor water supply before extended freezing temps arrive.
Clean Screens
Remove and clean the screens inside spigot nozzles periodically to remove mineral buildup that can impede water flow.
Taking steps to properly maintain your outdoor spigots will keep them in good working order for many years. Pay attention to any signs of problems and address them promptly.
Preventing Frozen Pipes
Along with protecting outdoor spigots, it’s crucial to prevent frozen pipes throughout your plumbing system. Here are some tips:
- Insulate pipes in unheated areas like attics, basements, or crawl spaces.
- Seal any leaks or gaps letting cold air inside near pipes.
- Disconnect and drain hoses from exterior faucets.
- Open cabinet doors to allow heat near sinks on exterior walls.
- Let faucets drip during extreme cold temperatures.
- Know the location of your main water shut-off valve.
Catching frozen pipes early is key to minimizing damage. If you suspect a pipe is freezing, call a plumber immediately to assess the situation. Taking preventive measures can help avoid frozen pipe headaches!
Dealing with Frozen Pipes
If you do end up with frozen pipes, here is how to handle it:
1. Shut Off the Water
Locate the main shut-off valve for the home and turn it off. This prevents pipes from bursting when they thaw.
2. Open Faucets
Turn on the faucet connected to the frozen pipe so water can escape when thawing begins.
3. Apply Gentle Heat
Use a hair dryer, space heater, or heating pad to gently warm the frozen section, starting closest to the faucet end. Never use open flame!
4. Check for Leaks
Once the pipe has thawed, check for cracks or splits that could leak. Slowly turn the water back on and look for drips.
5. Allow Water to Run
After the pipes thaw, let the faucet drip and run water for a while to allow any chunks of ice to melt and flow out.
6. Insulate Pipes
Better insulate vulnerable pipes to prevent recurrence of the freezing issue going forward.
With patience and care, frozen pipes can be thawed safely. But prevention is much easier – take proactive steps to protect pipes before winter hits!
Conclusion
Dealing with frozen outdoor spigots and pipes in winter can be frustrating. But installing frost-proof or self-draining spigots provides effective protection, even in extreme cold. Insulating exposed pipes is also important. With the right materials and preventive maintenance, you can keep your outdoor and indoor plumbing happily flowing all winter long. By following the tips provided, your spigots and pipes will stay freeze-free this season.