Changing brake pads and rotors is one of the most common DIY auto repairs. With the right tools and a bit of know-how, you can save hundreds of dollars by doing it yourself. While a professional mechanic has thousands of dollars worth of tools, you only need a basic set of hand tools to get the job done on most vehicles.
Page Contents
Safety Equipment
Before getting started, make sure you have the proper safety gear. At a minimum you’ll need:
- Safety glasses – protect your eyes from debris and dust
- Work gloves – prevent skin abrasions and burns
- Jack and jack stands – safely lift and support the vehicle
- Wheel chocks – prevent accidental vehicle movement
- Brake cleaner – remove grease, oil and debris from brake parts
Never get under a vehicle supported only by a jack. Always use secure jack stands to avoid serious injury. Chock the wheels, set the parking brake and only work on level ground. Use fender covers to avoid brake dust and debris damage to the wheel well paint. Work in a well ventilated area since brake cleaner and dust pose inhalation hazards.
Basic Hand Tools
In addition to safety gear, you’ll need a basic set of hand tools. Here are the most common tools required:
- Ratchet and socket set
- Combination wrenches
- Pliers
- Screwdrivers
- Hammer
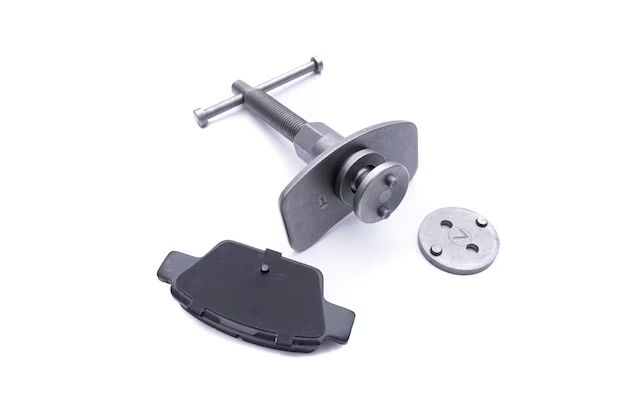
- Brake caliper tool
- C-clamp or brake caliper compressor
Many brake jobs can be accomplished with just these basic tools. However, having a few special tools like a brake caliper tool and compressor make the job much easier. They allow you to safely retract the piston and brake pads back into the caliper assembly. Using just a C-clamp to compress the caliper piston is hard on the brake components and covers your hands in brake fluid. Proper brake tools are well worth the small investment.
Advanced Tools
More complicated brake work on performance, luxury and heavy-duty vehicles require some advanced tools. Here are some you may need:
- Impact wrench and sockets
- Brake pad spreader
- Snap ring pliers
- Disc brake piston tool
- Ball joint separator
- Wheel bearing grease packer
- Brake hone or disc resurfacing tool
Many trucks and performance cars have large heavy rotors retained by bolts that require an impact wrench for quick removal. Brake pad spreaders help avoid damage by providing even pad retraction off the rotor. Snap ring pliers allow safe removal of caliper slide pins. A piston tool threads into the caliper piston for retraction on stubborn or corroded pistons. Separators help remove stubborn ball joints and tie rods. A wheel bearing packer properly presses grease back into the bearings. Finally, a brake hone is needed if you’re refinishing a damaged rotor surface.
Parts and Supplies
In addition to tools, you’ll need replacement parts and supplies. Here are the most common items required for a brake job:
- Brake pads
- Brake rotors
- Caliper hardware kit
- Caliper slide pin grease
- Brake cleaner or degreaser
- Brake fluid
Always replace brake pads in complete axle sets. Mixing old and new pads between wheels can cause braking problems. Rotors should also be replaced in pairs, or at minimum machined to match thickness. Hardware kits include slide pins, bushings, shields and retaining clips. Use high temperature caliper grease on all slide pins and mounting hardware. Have plenty of brake cleaner and shop rags to thoroughly clean brake parts. Check fluid levels and have an extra bottle of brake fluid on hand just in case. Dot 3 and Dot 4 are most common.
Optional Specialty Tools
While not required for most backyard mechanics, there are some specialty brake tools that can make certain tasks easier. Here are a few popular options:
- On-car brake lathe
- Brake bleeder and vacuum pump
- Digital/dial caliper tool
- Brake line bender
- Flaring tool kit
A brake lathe bolts to the hub assembly and machines the rotor surface smooth without removing from the vehicle. Vacuum pumps connect to the bleeder screw and use suction to purge air from brake lines. Digital calipers precisely measure rotor thickness variation and lateral runout. Brake line tools allow you to custom bend and flare replacement brake hard lines. While not essential, these tools certainly make brake work faster with professional quality results.
The Right Tools Save Time and Money
As you can see, servicing your brakes requires a decent variety of tools. The basic essentials allow brake pad and rotor replacement on most vehicles. Advance kits add luxury car capability, while professional specialty tools take your skills to the next level. Equipped with the right tools, you can perform brake work quickly and safely without relying on expensive shops. Remember to always invest in high quality tools from reputable brands. Your safety depends on it!
Parts Involved in a Brake Job
When servicing your brakes, there are several key parts that typically require replacement or maintenance. Being familiar with these components is important for a smooth brake job.
Brake Pads
Brake pads are a wear item that requires periodic replacement. Most quality pads will last 20,000 – 70,000 miles depending on driving conditions and pad compound. Replacing pads before they are fully worn prevents damage to rotors.
Brake Rotors
Rotors are metal discs that sandwich with the brake pads to create friction. They can become warped or worn over time. Resurfacing or replacing rotors prevents pulsation and ensures straight true braking.
Calipers
Calipers house the brake pads and use hydraulic pressure to pinch them against the rotor. Sticking calipers must be cleaned, lubricated or rebuilt to maintain proper brake function.
Brake Lines
Rubber flexible hoses and steel lines route brake fluid from the master cylinder to each caliper. Cracked or leaking lines allow air and moisture contamination.
Hardware
Shims, slide pins, clips and other hardware support proper caliper function. Corroded or worn hardware can bind brakes. Hardware kits provide affordable insurance.
Main Steps to Replacing Brakes
While each vehicle is slightly different, brake jobs typically follow the same series of major steps. Understanding the process from start to finish helps avoid surprises mid-job.
1. Inspection
Start by thoroughly inspecting brake components. Look for pad thickness, rotor condition, worn hardware and leaks. This informs what parts will need replacement.
2. Disassembly
Safely lift and support the vehicle. Remove wheels, calipers, brackets, rotors and other components as needed to access pads.
3. Cleaning
Thoroughly clean, degrease and prepare parts for fresh hardware, fluid and lubricants. Avoid cross contamination.
4. Installation
Install new pads, rotors, hardware and reassemble in reverse order. Use proper torque specs and grease.
5. Bleeding
Bleed brake lines of any trapped air. Refill fluid to proper level and check for leaks.
6. Bedding
Properly bed in the new brake pads per manufacturer instructions to transfer material.
DIY or Hire a Mechanic?
Replacing brakes yourself can save hundreds of dollars in labor costs. However, not everyone has the skills, tools and experience to tackle major brake work. Here are some pros and cons of DIY vs professional brake service:
| DIY Brake Job | Professional Brake Job |
|---|---|
| Saves on labor costs | Experienced mechanic does the work |
| Gain mechanical experience and confidence | Access to professional tools and equipment |
| Braking work done on your schedule | Insured shop handles liability |
| Potential todamage components | Additional costs for labor and shop fees |
If tackling major brake service for the first time, it’s a good idea to have an experienced mechanic inspect your work afterward. For many DIYers, a combination of doing some repairs themselves and outsourcing bigger jobs provides the ideal balance of cost savings and professional quality.
Top Brake Job Mistakes
While replacing brakes is one of the more straightforward DIY repairs, mistakes still occur. Being aware of some common pitfalls helps avoid problems down the road:
Not Replacing in Complete Sets
Always replace pads and rotors as complete axle sets – mix and matching can cause braking imbalance.
Neglecting Hardware
Corroded slide pins, shims and clips lead to sticking and seized calipers.
Using Wrong Brake Fluid
Ensure you use the correct fluid type recommended by the manufacturer.
Allowing Contamination
Prevent grease, oil and dirt from contaminating pads and rotors.
Incorrect Bedding
Proper pad bedding procedure is critical to transfer material and avoid glazing.
Riding the Brake Pedal
Avoid resting your foot on the brake after replacement to allow full pad retraction.
FAQ
Is it ok to just replace the pads and not the rotors?
It depends. If rotors still have adequate thickness and are in good condition, they can be left in place. However, worn, damaged or thin rotors should always be replaced when pads are changed.
How often should brake fluid be changed?
Brake fluid should be flushed every 2-3 years to avoid moisture contamination. Use this service interval to also inspect brake lines and components.
What tools are absolutely necessary for a brake job?
At minimum, you’ll need a socket set, combination wrenches, screwdrivers, brake cleaner, jack and jack stands. Add a caliper compressor tool for easiest DIY experience.
Is it hard to bleed brakes yourself?
Bleeding brakes can be tricky without a helper or vacuum pump. Make sure one person pumps the pedal while the other opens bleeder screws. Patience and proper sequence is key.
Can I just replace one pad that is worn?
Never. All axle pads must be replaced as a complete set to maintain equal braking force side to side.
Conclusion
Replacing brakes yourself provides big cost savings compared to shop rates. With some basic tools, parts and know-how, the average DIYer can complete a brake job on most vehicles. However, don’t be afraid to ask a professional for help inspecting your work and bleeding the system afterwards. Maintaining your brakes is one of the most important automotive safety tasks. Take your time and do the job right.