Changing your own oil can save you money and allow you to get to know your vehicle better. However, to complete an oil change safely and efficiently, having the right tools on hand is essential. The basic tools needed are not expensive or difficult to obtain. With a little preparation and the proper equipment, you can change your oil quickly and properly.
Page Contents
Required Tools
Here are the basic tools you’ll need to change your oil:
Oil drain pan
An oil drain pan is used to collect the used oil as it drains out of the engine. Look for one that can hold at least 4 quarts of oil safely. The drain pan should be made of a durable material that won’t bend or warp when full. A pan with a spout will make it easier to pour the old oil into a disposal container when finished.
Wrench set
You’ll need the correct size wrench or socket to loosen the oil drain plug and oil filter. Most drain plugs require a 3/8″ ratchet or wrench. Check your owner’s manual for the specific size needed. The oil filter will also require a special wrench that grips and turns the filter canister. This can usually be purchased separately if it’s not included with your wrench set.
Jack and jack stands
Safely raising your vehicle off the ground provides access to the oil drain plug and filter. A sturdy floor jack and two jack stands rated for your vehicle’s weight are the safest way to lift it up. If you don’t want to buy a floor jack, you can use ramps to gain access underneath.
Rags
Have plenty of clean rags on hand. You’ll need them to wipe off any spilled oil and to clean the area around the drain plug and oil filter. Paper towels can also be used.
Gloves
Wearing gloves will keep oil off your skin and allow for a better grip when loosening stuck parts. Nitrile gloves designed for auto work are ideal, but standard latex gloves can also be used.
Funnel
A funnel is required to guide new oil into the engine and prevent spills. Purchase a large plastic or metal funnel designed for pouring oil. Make sure it has a wide mouth for easy pouring.
Oil filter wrench
Most oil filters are removed by hand, but some may require an oil filter wrench for grip. This specialized wrench wraps around the exterior of the filter for leverage when turning.
Optional Tools
While not strictly necessary, here are some other handy tools for oil changes:
Creeping floor jack
A creeping floor jack allows you to lift your vehicle and move around without the need to place jack stands. This provides greater access to the underside. Look for one with a high weight rating and follow the safety guidelines.
Oil filter cap wrench
If your engine has a cap located over the oil filter, you’ll need this specialized tool to remove it before accessing the filter.
Torque wrench
A torque wrench ensures you tighten the drain plug and oil filter properly. While not essential, it’s the best way to prevent overtightening that can damage the engine.
Oil pump
An oil pump can suck old oil out through the dipstick tube without the need to crawl under the vehicle or lift it up. This isn’t a necessary tool, but it can make the oil change quicker and cleaner.
Consumable Items
In addition to tools, you’ll need the following consumable items:
Engine oil
Have the proper type and amount of new engine oil on hand before starting. Refer to your owner’s manual for the recommended oil spec and capacity. Never mix oils.
Oil filter
Get a new oil filter designed specifically for your vehicle’s make, model and engine. Aftermarket brands are fine, but make sure it’s the correct one for your car.
Washer for drain plug
The drain plug washer helps provide a leak-free seal. It’s good practice to replace it with a new one each oil change. They are very inexpensive.
Shop rags
Have plenty of clean shop rags or paper towels to use while changing the oil and checking levels. Dirty rags can contaminate the new oil.
How Much Oil Do You Need?
Use the specified type and amount of oil required by your vehicle’s manufacturer. This key information can be found in your owner’s manual.
As an example, here are the oil capacities for some popular vehicle models:
| Vehicle Make/Model | Engine Oil Capacity (quarts) |
|---|---|
| Toyota Camry 2.5L | 4.5 |
| Honda Civic 1.5L | 3.4 |
| Ford F-150 5.0L | 6 |
| Chevy Silverado 5.3L | 6 |
Step-by-Step Oil Change Instructions
Now that you know which tools and materials are required, follow these key steps to properly change your oil:
Prepare the vehicle
– Park on a flat surface and apply parking brake. Raise hood to allow engine to cool if recently running.
– Jack up vehicle or drive onto ramps at oil drain side. Secure with jack stands.
– Locate oil drain plug, filter and cap if equipped.
Drain oil
– Position drain pan underneath oil drain plug.
– Use wrench to loosen plug. Turn counter clockwise to loosen.
– Once loosened, unscrew plug completely by hand and let oil drain into pan.
Change oil filter
– Use oil filter wrench to grip and turn filter counter clockwise.
– Unscrew filter completely by hand and allow any residual oil to drain.
– Wipe mounting base surface clean with a rag. Apply light coat of new oil to gasket of new filter.
– Screw new filter by hand until gasket contacts the base. Tighten about 3/4 to 1 full turn more.
Replace drain plug
– Check drain plug washer for damage. Replace if necessary.
– Wipe off drain plug threads to remove grit and grime.
– Reinstall drain plug by hand until tight. Then use wrench to finish tightening about 1/4 to 1/2 turn more. Do not over tighten.
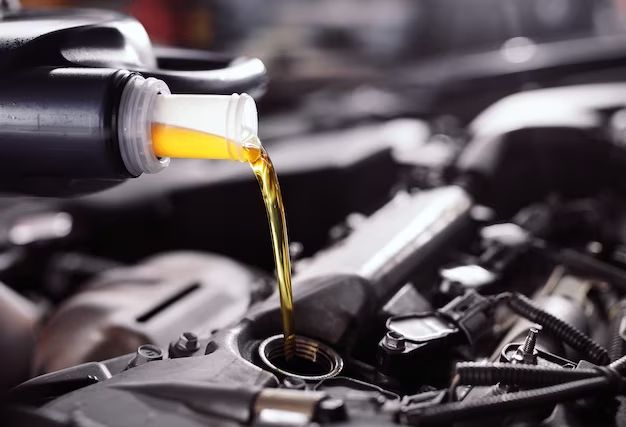
Refill with new oil
– Locate oil fill cap. Remove cap/dipstick.
– Place funnel into opening. Pour in new oil type and amount specified in owner’s manual.
– Insert dipstick and check oil level. Add more if needed until level reads full.
– Replace oil fill cap when finished refilling.
Check for leaks
– Remove jack stands and lower vehicle.
– Start engine and let idle for 5 minutes.
– Turn engine off and wait a few minutes.
– Check for any leaks underneath near drain plug and oil filter.
Recheck oil level
– Allow oil to settle and return to oil pan.
– Remove dipstick and wipe clean with a rag.
– Reinsert and pull out again to check level. Top up if needed.
Clean up
– Wipe any drips or spills from components and toolbox.
– Dispose of old oil filter and drain oil properly.
– Wash hands with soap.
Conclusion
With this guide, the basic tools, and a little mechanical ability, you can start changing your own oil. An oil change is one of the most straightforward DIY auto maintenance tasks. Performing it yourself will save money and give you confidence and knowledge about your vehicle. Just be sure to take all necessary safety precautions, follow each step carefully, and properly dispose of used oil.
Changing your vehicle’s motor oil does not need to be a mysterious or intimidating process. The required tools are very affordable and readily available online or at any auto parts store. Use this list to gather everything you’ll need and keep your car’s engine protected.
Safety Tips
– Never work under a vehicle supported only by a jack. Use jack stands.
– Allow adequate time for oil to drain completely to prevent spills.
– Wear eye protection when working under the vehicle.
– Dispose of used oil properly. Don’t pour down drains or onto ground.
– Wash your hands thoroughly after changing oil.
With the right tools, safety practices and these step-by-step instructions, you can start doing your own oil changes and save time and money through regular maintenance.