Skim coating is a process used to smooth over rough or textured walls and ceilings to create a new flat surface. It involves applying a thin coat of joint compound or skim coat plaster using specialized tools to fill in imperfections and create a seamless finish. Proper skim coating requires the right set of tools to ensure it is done efficiently and effectively. Having the proper skim coating tools on hand will make the job much easier. So what tools do you need for skim coating? Here is a look at the essential skim coating tools every DIYer should have.
Page Contents
Drywall Knife
A drywall knife, also called a taping knife, is a critical skim coating tool. You’ll use a drywall knife to spread the skim coat plaster or joint compound smoothly and evenly across the surface. The most common sizes for skim coating are a 6-inch drywall knife for skim coating walls and a 10 or 12-inch knife for ceilings and larger areas. Look for a high-quality stainless steel knife with a sturdy, comfortable handle. The blade should have a slight flex but feel firm enough to evenly spread the skim coat mix without leaving ridges. Having at least a 6-inch and a 12-inch knife on hand will make skim coating easier.
Hawk and Trowel
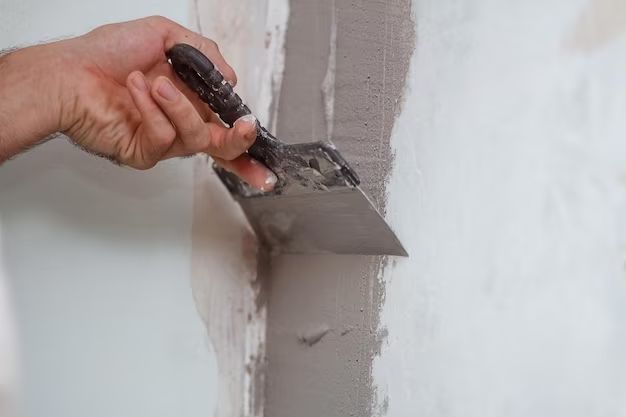
A hawk and trowel are essential skim coating tools that work together to hold and smoothly apply the skim coat material. The hawk is a flat, rectangular tool with a handle on one side that you place the skim coat mixture on. The trowel is a handheld tool with a rectangular metal blade used to scoop and spread the material from the hawk onto the wall’s surface. The hawk provides an easily portable platform to hold the skim coat mix, while the trowel allows you to control the amount applied. Having both tools is necessary for efficient skim coating application.
Paint Roller and Roller Handle
Another useful skim coating tool is a standard paint roller with a roller handle. You can use a high-nap type roller 3⁄4 inch or longer to roll over the final skim coat layer and help create a smooth, consistent finish. Slowly rolling over the skim coated surface with light pressure will help blend any remaining ridges or lap marks. Using a paint roller is an easy way to help achieve a flawless skim coat finish.
Paintbrush
It’s helpful to have a few standard paintbrushes on hand when skim coating. An angled brush works well for spreading the skim coat into corners or tight areas that are hard to reach with larger tools. A paintbrush can also be useful for smoothing out the edges of repaired patches to blend them with the surrounding surface. Brushes give you greater control and precision in specific areas.
Sanding Pole and Sandpaper
Once the skim coat dries thoroughly, you’ll need to sand it smooth before painting. A sanding pole is a great tool to sand large flat areas like walls and ceilings. It has sandpaper attached to a telescoping pole that lets you sand skim coated ceilings from the floor. For smaller areas, you can use a hand sanding block. Make sure to use 150 to 220 grit sandpaper to smooth the dried skim coat layer evenly without removing too much material. Proper sanding is key to achieving a blemish-free finish.
Joint Compound Pump
If you plan to skim coat very large areas, consider investing in a joint compound pump system. It consists of an air compressor that connects to a spray gun to pump out premixed joint compound. A joint compound pump allows you to spray apply skim coat material much faster than manual application with a trowel. This can greatly speed up the skim coating process and is ideal for coating entire rooms or floors. Just be sure to backroll and smooth the pumped material evenly.
Plaster Mixing Bucket
You’ll need a way to mix up your skim coat plaster or joint compound to the proper consistency before starting. A plaster mixing bucket with gallon measurements marked inside makes this easy. Mix the powder and water to the manufacturer’s specifications until you achieve a thick, creamy consistency. Let the mix stand for 5 minutes, then do a final mix before loading it onto your hawk or into the joint compound pump.
Protective Gear
Since skim coating is messy, be sure to protect yourself with goggles, dust masks, gloves, and protective clothing. Safety goggles will keep plaster splatter out of your eyes. A dust mask will prevent inhaling fine powder while sanding. Gloves help keep your hands clean and comfortable when spreading the skim coat mix. Wear clothing you don’t mind getting messy. Proper safety gear makes the job safer and easier.
Other Helpful Skim Coating Tools
Here are a few other handy tools for skim coating:
- Utility knife – for scraping and trimming skim coat edges
- 5 gallon buckets – for holding joint compound and clean water
- Putty knives – for smoothing small areas and hard to reach spots
- Drop cloths – for protecting floors and furnishings from splatter
- Step ladder – for reaching ceilings and high walls
- 150 grit sanding block – for smoothing corners and edges
- Shop vacuum – for quick clean up of dust while sanding
Key Tools for Skim Coating
To recap, here are the most essential tools you’ll need for skim coating:
| Tool | Purpose |
|---|---|
| Drywall knife | Spreading skim coat mix evenly |
| Hawk and trowel | Holding and applying skim coat |
| Paint roller | Smoothing final skim coat layer |
| Paintbrushes | Spreading skim coat into corners |
| Sanding pole and sandpaper | Sanding dried skim coat smooth |
Having the proper basic skim coating tools is essential for success. With a little practice using a drywall knife, hawk, trowel, and roller, you can transform rough, uneven walls into smooth surfaces that look professionally finished. Remember to always wear proper safety gear like goggles and masks when skim coating. Investing in quality skim coating tools will make the demanding job of resurfacing walls much more efficient and rewarding.
Conclusion
Skim coating is an effective way to create flawless looking walls and ceilings, but having the proper tools is half the battle. Key skim coating tools include taping knives, a hawk and trowel, paint roller, sanding equipment, and protective gear. With practice using these essential tools, anyone can master the art of skim coating. Taking the time to gather the right tools will set you up for success and make skim coating much easier to complete. Focus on buying quality tools like stainless steel knives, adjustable sanding poles, and comfortable protective gear. Your walls and ceilings will look professionally finished when you have the right set of skim coating tools.