Doing your own brakes can save you money compared to taking your car to a mechanic, but you need the right tools to do the job properly. When replacing brake pads and rotors, there are some essential tools you’ll need, as well as some that will make the job easier. Having the right equipment will ensure you don’t damage your car and that the brakes work correctly when you’re done.
Page Contents
Required Tools
Here are the basic tools required to do a brake job:
Jack and Jack Stands
Safely lifting your vehicle to work on the brakes requires a jack and jack stands. A floor jack is the easiest type to use for getting access to the brakes. Jack stands prevent the car from falling if the jack fails. At least two jack stands are needed to securely support the car. Never rely on just a jack when working under a vehicle.
Wheel Lug Wrench
A wheel lug wrench fits the lug nuts on your wheels. It’s usually a cross or hex shape. You’ll need to remove the lug nuts to take the wheels off when changing brake pads or rotors. The lug wrench that comes with your car should work.
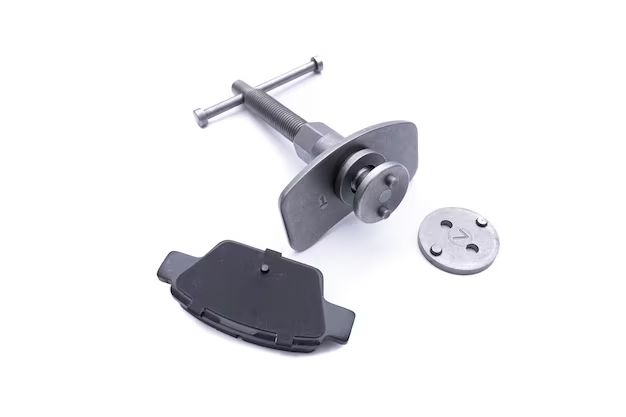
Brake Caliper Tool
Disc brake calipers have one or more pistons that need to be compressed when changing pads. A brake caliper tool screws in to evenly push the piston back into the caliper housing. Some vehicles use a specific caliper tool, so check what’s needed for your car’s brake caliper type.
Brake Pad Grease
Applying a thin layer of high-temperature brake pad grease to contact points reduces brake noise when bedding in new pads. It helps smooth the mating surfaces. Make sure to use a brake lubricant and not general grease.
C-Clamp
For rear drum brakes, a C-clamp can be used to push the brake cylinder piston in when changing shoes. Check your manual for the proper procedure for your vehicle. C-clamps can also help compress stubborn brake caliper pistons on disc brakes.
Torque Wrench
Wheel lug nuts must be tightened to the proper torque when reinstalling wheels. A torque wrench ensures you don’t over or under tighten the lug nuts. Set the torque wrench to the specification in your owner’s manual. Never use an impact wrench for final tightening.
Brake Cleaner
Special brake cleaner spray helps remove oil, grease, and debris from brake parts during service. Ensuring components are clean improves braking. Avoid getting brake cleaner on paint.
Helpful Additional Tools
These tools make servicing your brakes easier:
Bungee Cords
Hooking bungee cords from coils springs to suspension parts can help compress a coil spring and make it easier to remove brake caliper bolts. Watch your fingers when releasing the tension.
Wire Brush
A wire brush helps remove rust and debris from brake rotors, drums, calipers, brake pads, and backing plates. Cleaning components improves braking performance and prevents issues.
Brake Fluid Tester
A brake fluid tester checks the boiling point of brake fluid in your vehicle. Over time, brake fluid absorbs moisture which lowers its boiling point. Fluid should be changed if the boiling point is too low.
Brake Adjusting Tool
Rear drum brakes have an adjusting lever to maintain proper shoe clearance as the shoes wear. A brake adjusting tool makes it easier to adjust the lever according to specifications.
Brake Bleeder Bottle
When bleeding brakes, fluid is removed through bleeder screws. A brake bleeder bottle collects old fluid instead of draining it on the ground. Properly dispose of used fluid.
Flare Nut Wrench
Brake lines use flare nut fittings. A flare nut wrench fits on the flats of the nut for removing brake lines. Protect brake lines from being twisted.
Brake Spoon
A thin steel brake spoon can help remove the outer pad retaining clips on some brake pad sets. Take care not to bend or break the clips.
Parts and Materials You May Need
In addition to tools, here are some parts and supplies you may need:
- Brake pads – Check your manual for the correct pads for your vehicle
- Brake rotors – Match rotor dimensions to original spec
- Wheel bearing grease – For repacking bearings
- Brake hardware kit – Includes clips, springs, pins etc.
- Brake caliper bolt kit – Rubber coated bolts prevent corrosion
- Brake fluid – Use DOT 3 or 4 fluid as specified
- Brake line – If a line needs replacement, match size and type
Safety Equipment
Your safety is important. Be sure to use these items:
- Safety glasses
- Work gloves
- Dust mask
- Hearing protection
- Sturdy footwear
- Jack stands
- Wheel chocks
The Brake Job Process
Here is an overview of the typical brake service steps:
- Lift the vehicle and secure on jack stands
- Remove the wheels
- Detach the brake caliper and hang it up
- Remove the brake pads and retain hardware
- Clean the brake caliper pistons, cylinders, assembly
- Check the brake rotors – either resurface or replace
- Install new brake pads and any hardware
- Compress the caliper piston and reinstall the caliper
- Repeat process on each wheel
- Refill brake fluid and bleed system if needed
- Bed in the new brake pads per the manufacturer instructions
- Road test the vehicle and check for proper brake operation
Always refer to your vehicle repair manual for the proper procedures. Brake system design varies between vehicle makes and models.
Servicing Disc Brakes
Disc brakes have brake pads that clamp onto a spinning rotor surface to create braking friction. Here are disc brake service steps:
- Clean the brake caliper and visible brake parts with brake cleaner spray. Do not get cleaner on rubber parts.
- Remove the two brake pad retaining bolts or clips. Use a brake spoon tool if needed.
- Lift out the brake pads. Note orientation for reassembly. Retain any associated hardware.
- Use a brake caliper tool to twist the piston back into its cylinder until flush with the housing.
- Inspect the brake rotor. Resurface or replace if thickness is less than minimum spec.
- Apply brake pad grease to contact points on the new pads and caliper.
- Install new brake pads in reverse order of removal. Correct orientation is critical.
- Reinstall brake caliper over rotor and secure with bolts tightened to spec with a torque wrench.
- Repeat steps on the second brake caliper.
Always check for leaks after servicing. Bleed the brakes if any hydraulic lines were disconnected. Bed in the new pads per manufacturer instructions.
Disc Brake Pad Replacement Tips
- Check brake pad thickness regularly as part of inspection
- Always replace inner and outer pads as a set
- Never attempt to pry pads out – use retaining bolts or clips
- Don’t press brake pedal without pads loaded
- Compare old and new pads to confirm correct application
- Double check pad orientation against the old set
- Apply pad grease only to contact points, not friction surface
Correctly replacing brake pads prevents damage and ensures proper braking ability.
Disc Brake Rotor Resurfacing
Rotors can be resurfaced if thickness remains above the discard dimension. Use these rotor service tips:
- Inspect closely for cracks or heat damage – replace if observed
- Machine rotor on vehicle with an on-car brake lathe or off vehicle with a bench mounted unit
- Maximum total resurfaced amount is 0.060 inches for most vehicles
- Avoid excessive heat during resurfacing which can cause cracking
- Clean rotor with brake cleaner after resurfacing
Rotors must be fully supported during cutting. Discard and replace warped or heavily grooved rotors.
Servicing Drum Brakes
Drum brakes use a set of curved brake shoes that press outward against the inner drum surface. Here are the steps for servicing drums:
- Remove the brake drum after retracting the parking brake.
- Disconnect and remove the brake shoes with retaining springs.
- Clean the brake assembly with brake cleaner spray.
- Check drum inner surface for scoring or heat damage – lightly sand or resurface as needed.
- Use a C-clamp to push the wheel cylinder piston in fully.
- Check the drum inner diameter – replace drum if worn over spec.
- Install new brake shoes, springs, and any clips or pins.
- Reconnect the parking brake cables.
- Reinstall drum and adjust shoes to proper clearance.
Refer to the manual for the correct shoe adjustment procedure. Always work one wheel at a time and avoid mixing up components.
Drum Brake Replacement Tips
Follow these tips when servicing drum brake components:
- Always replace shoes as a complete set, including springs
- Check condition of wheel cylinders for leaks
- Lubricate contact points with brake lubricant
- Adjust clearance when shoes are new
- Replace hardware kits with new springs and clips
- Ensure parking brake cables are routed correctly
- Road test parking brake operation after service
Taking the time to properly replace drum brake components prevents problems and ensures safe operation.
Bleeding the Brakes
If any brake hydraulic line was opened during service, bleed the brakes afterwards. This removes air trapped in the system:
- Fill the master cylinder reservoir with proper brake fluid to the full line.
- Begin farthest from the master cylinder – right rear wheel bleeder.
- Attach clear hose to bleeder with free end in a container.
- Open bleeder and have assistant slowly pump brake pedal.
- Close bleeder when fluid expelled is free of air bubbles.
- Repeat process at each succeeding closer wheel.
- Recheck fluid level and top off as needed.
- Test brake pedal feel before driving vehicle.
Bleeding the hydraulic system is crucial to restore proper braking function. Take precautions against brake fluid spillage.
Bedding in New Brake Pads
New brake pads require a proper break-in period to transfer material evenly to rotors or drums:
- Normal street driving for the first 200 miles.
- Avoid excessively heavy braking.
- Then perform a series of 8-10 hard stops from 60 mph down to 5-10 mph.
- Let brakes fully cool between cycles to avoid overheating.
- Finish with normal driving to evenly transfer pad material.
Always follow pad manufacturer instructions for proper bedding procedures. This prevents uneven pad deposits and vibration issues.
Conclusion
Doing your own brake service requires some investment in tools like a torque wrench, jack stands, and brake caliper tools. But the savings add up quickly compared to shop labor rates. Make sure to use top quality replacement parts like brake pads and rotors. Follow all procedures carefully, including bedding in new pads. Your brakes are one system you don’t want to take shortcuts on. Having the right tools allows you to service your brakes properly and have confidence on every drive.