Removing a sway bar link is a common repair that many DIY mechanics take on. While it may seem daunting if you’ve never done it before, having the right tools makes the job much easier. In this article, we’ll go over everything you need to get the job done smoothly.
Page Contents
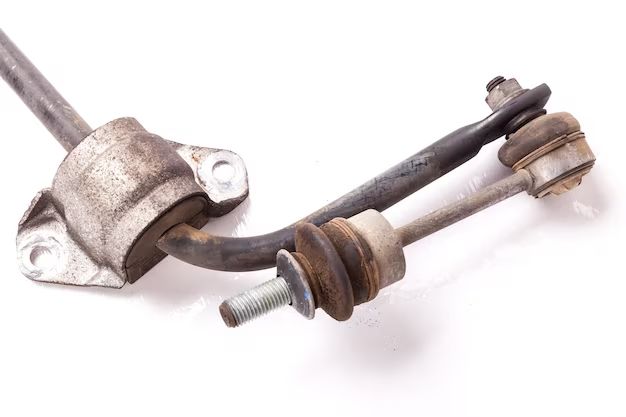
What is a Sway Bar Link?
First, let’s cover what exactly a sway bar link is and what its purpose is. The sway bar, also known as an anti-roll bar, is a critical component of your vehicle’s suspension system. Its job is to improve handling and reduce body roll in turns. The sway bar links connect the sway bar to the control arms or struts and allow the sway bar to move freely as the suspension travels up and down.
Over time, the sway bar links can wear out or become damaged. Worn links will make noise when driving over bumps and affect the handling of your vehicle. Replacing them restores proper suspension function and ride quality. The links are connected with ball joints on each end, allowing angular motion. Bushings or bearings inside the links allow them to pivot freely.
Basic Tools Needed
Replacing sway bar links is straightforward with the right tools. Here are the basic tools you’ll need:
- Floor jack and jack stands
- Basic hand tools – wrenches, sockets, ratchet, extensions
- Pliers
- Penetrating fluid
- Replacement sway bar links
Having a floor jack and jack stands is critical to safely raise and support the vehicle off the ground. You’ll need to access the underside of the front suspension to remove the links. Hand tools like wrenches, sockets, and ratchets will allow you to loosen and remove the fasteners. Pliers help grip rounded or stuck fittings. Penetrating fluid helps free up rusty bolts.
Be sure to get replacement links designed specifically for your make and model. They are available at most auto parts stores. Polyurethane links last longer than factory rubber links.
Sockets and Wrenches
The sway bar link nuts and bolts will likely be metric, so having metric wrenches and sockets is essential. Here are some sizes to have on hand:
- 12 mm
- 14 mm
- 15 mm
- 17 mm
- 18 mm
- 19 mm
1/2″ and 3/8″ ratchets with extensions will allow you to reach the bolts from above the vehicle. The ball joints are often disconnected with larger 36 mm sockets. Make sure everything is in good condition without rounded edges or cracks.
Other Helpful Tools
Though not strictly necessary, here are some other handy tools for removing sway bar links:
- Ball joint separator – makes separating tapered ball joints easier
- Breaker bar – provides extra leverage to loosen tight bolts
- WD-40 or PB Blaster – penetrant fluids to loosen rusty parts
- Vice grips or locking pliers – grip rounded off fittings
- Hammer – help free stuck parts
- Jack stand under suspension arm – support during disassembly
Taking advantage of these tools makes the job much less frustrating. Ball joint separators prevent damage during separation. Breaker bars provide more leverage than a ratchet. Penetrating fluids applied well in advance can save rounding off bolts. Pliers help turn rounded fittings. A hammer taps components loose, and a jack stand takes stress off during removal.
Safety Equipment
When working under a vehicle, safety should be your top priority. Here are some essential safety items:
- Jack stands – support the vehicle in multiple spots
- Wheel chocks – prevent accidental rolling
- Work gloves – protect your hands
- Eye protection – keep debris out of your eyes
- Face mask – avoid breathing dirt/rust
- Mechanics creeper – roll around rather than lie on ground
- Headlamp – illuminate dark areas under car
Never get under a car supported only by a jack, use sturdy jack stands. Chock the wheels so the car can’t roll off the stands. Gloves and eye protection reduce injuries. A mask prevents inhaling debris. A creeper allows you to work comfortably. A headlamp lets you see what you’re doing.
Shop Materials
Having certain supplies in your shop area can also help with sway bar link replacement:
- Clean rags – wipe off parts and tools
- Drip pan – catch fluids from ball joints
- Garbage bin – discard worn parts and wrappers
- Soap and water – clean hands after job
- Torque wrench – tighten bolts correctly
Rags help keep things clean while working. A drip pan catches grease and oil drips from the ball joints. Have a garbage bin close by for wrappers and worn parts. Wash up when finished, as suspension work gets hands dirty. A torque wrench ensures proper bolt tightening.
Making the Job Easier
Here are some tips to make replacing sway bar links as smooth as possible:
- Use penetrating oil on stuck bolts a day before
- Break bolts loose before lifting vehicle
- Disconnect ball joint sleeve from arm, not link
- Support control arm with jack stand when separating ball joint
- Clean all mating surfaces before installation
- Apply thread locker to link fasteners
- Torque bolts to specification with torque wrench
Advance penetrating oil gives it time to work. Breaking free bolts while wheels are on the ground allows maximum force. Unbolting the sleeve from the control arm prevents it from spinning. Supporting the arm relieves stress on the components. Clean, dry surfaces allow proper tightening. Thread locker prevents loosening. Torquing to spec ensures a safe installation.
Recommended Tool List
To recap, here are the tools recommended for DIY sway bar link replacement:
| Tool | Purpose |
|---|---|
| Floor jack | Safely lift vehicle |
| Jack stands | Support vehicle |
| Wheel chocks | Prevent rolling |
| Metric wrench set | Turn link nuts |
| Metric socket set | Loosen bolts |
| Ratchet and extensions | Access fasteners |
| Pliers | Grip rounded fittings |
| Ball joint separator | Separate tapered joints |
| Penetrating fluid | Loosen stuck parts |
| Breaker bar | Free stuck bolts |
| Torque wrench | Tighten bolts safely |
Investing in these tools will make sway bar link replacement much easier. You can tackle this repair job yourself and save money over paying a mechanic. Just be sure to use jack stands, support components properly, and use safety gear.
Estimating Costs of Tools
If you need to purchase tools for this job, here are rough estimates for budgeting purposes:
| Tool | Estimated Cost |
|---|---|
| Basic floor jack | $50-$100 |
| 2 Jack stands | $20 |
| Wheel chocks | $10 |
| Metric wrench set | $15-$40 |
| Metric socket set | $50-$100 |
| Extensions, ratchet | $20 |
| Vise grips | $10 |
| Ball joint separator | $15-$25 |
| Penetrating fluid (1 can) | $5 |
| Breaker bar | $15 |
| Torque wrench | $50-$150 |
Buying lower-cost versions of these tools can keep the total to under $300. Higher quality tools will cost more but last longer. Building up your tool collection over time helps spread out costs. Focus first on the basic necessities – jack, jack stands, socket set, and wrenches.
Safety Tips
Here are some important safety tips when working under a vehicle:
- Use wheel chocks and apply parking brake
- Check jack stands are rated for vehicle weight
- Place jack stands underneath factory jacking points
- Make sure vehicle is stable before working underneath
- Never use a jack as sole support
- Wear eye protection when hitting stuck parts
- Avoid laying directly on ground under vehicle
- Use gloves when handling worn components
- Dispose of used fluids properly
- Re-torque wheel lugs after installing wheels
Chocking wheels and applying the parking brake prevent accidental rolling. Quality jack stands prevent collapse. Jacking up at proper points keeps the vehicle stable. Test vehicle doesn’t shift before crawling underneath. A floor jack alone does not provide adequate support. Gloves and glasses protect from sharp edges and rust. Avoid laying on the ground to prevent back injury. Proper hazardous waste disposal preserves the environment. Retorque the wheels before driving to prevent loss of a wheel.
FAQs
What size wrench fits sway bar link nuts?
Common sway bar link nut sizes are 12 mm, 14 mm, 17 mm. Have a range of metric wrenches and sockets available. Use penetrating oil if nuts are stuck.
Do I need a special tool for sway bar links?
A ball joint separator tool makes separating the tapered ball joint easier and prevents damage. Other than that, standard hand tools are all that is generally required.
Should I replace both sway bar links at once?
Yes, it’s recommended to replace both left and right links as a pair even if only one is bad. They wear at the same rate, so a new one paired with an old is not ideal.
How do I stop a sway bar link from rattling?
A rattling link is likely worn out internally. Replacing the link with a new one will stop the noise. Be sure to lubricate the contact points during installation per manufacturer specs.
Is replacing sway bar links hard?
No, sway bar links are a fairly easy DIY job. With basic tools and proper safety, most mechanics can handle it in their home garage. Just be prepared with the right tools and take care supporting the vehicle.
Conclusion
Replacing worn out sway bar links is crucial for restoring proper handling and reducing suspension noise. With the tools outlined here – floor jack, jack stands, socket set, wrenches, and a ball joint separator – you can take on this repair yourself. Just be sure to use jack stands, support the control arm, and torque links to spec for safety. Investing in these basic tools allows you to change your links economically while knowing the job was done right.