Page Contents
Why do brakes need changing?
Brakes are a crucial safety component in your vehicle, so it’s important to know when they may need replacing or changing. Here are some of the main reasons brakes may need service:
Worn brake pads
Brake pads have a finite lifespan and will gradually wear down with use. As the pads wear, you’ll start to hear squeaking, grinding or other noises when braking. Visually inspecting the pads to check thickness is a good way to identify wear. Most pads have wear indicators that screech when the pad is getting thin.
Warped or grooved brake rotors
Over time, heat and pressure can cause the rotor surface to become uneven. This results in vibrations, pulsating pedal feel and longer stopping distances. Resurfacing or replacing rotors is often required when changing brake pads.
Brake fluid maintenance
Brake fluid absorbs moisture over time which lowers its boiling point. Old, contaminated fluid should be flushed and replaced per the manufacturer’s schedule to prevent brake failure. Fluid leaks also need to be addressed immediately.
Other mechanical issues
Sticking calipers, bad wheel bearings, loose hardware and other mechanical problems can all impact braking and necessitate repairs or replacements. Any deviation from normal braking feel or performance warrants inspection by a professional.
What do I need to buy when changing brakes?
The specific replacement parts needed for a brake job will depend on the make and model of vehicle, as well as which components need servicing. Here are some of the most common items:
Brake pads
Pads should always be replaced in axle sets. The front and rear brakes may use different pads. Purchase quality pads that meet OEM specifications from reputable brands.
Brake rotors
Rotors should be replaced if worn, warped or deeply grooved. Many choose to replace rotors as a pair with the pads for optimal results. Check sizing and tolerances when ordering new rotors.
Brake hardware
This includes pad retention clips, anti-rattle springs, slide pin boots, shims and other small hardware. Replace any worn or damaged pieces for proper operation. Hardware kits are often available.
Caliper bracket bolts
The caliper bracket bolts should be lubricated or replaced when servicing brakes per manufacturer specifications. This prevents bolts from rusting or seizing.
Brake fluid
Have fresh DOT 3 or DOT 4 brake fluid on hand to flush the old fluid and refill the system. Avoid contamination when refilling.
Miscellaneous
Other parts like brake cleaner, lubricant, e-clips, caps, seals and tools may be required for a complete brake job.
What tools do I need to change brakes?
Proper tools make DIY brake service much safer and easier. Here are some essential tools for most brake jobs:
| Tool | Purpose |
|---|---|
| Floor jack | Safely raise and support vehicle |
| Jack stands | Support vehicle once lifted |
| Wheel chocks | Prevent rolling while lifted |
| Basic hand tools | Wrenches, screwdrivers, pliers, etc. |
| Torque wrench | Tighten bolts to spec |
| Brake caliper tool | Compress piston for new pads |
| Brake fluid tester | Test fluid condition |
| Brake cleaner | Clean parts before reassembly |
Specialized tools like a ball joint separator may also be required depending on the job. Consult a vehicle-specific repair manual for all required tools. Renting specialty tools can make sense for a DIYer.
What safety precautions should I take?
Brakes are mission-critical to vehicle safety, so exercise caution and focus when servicing them yourself:
– Use jack stands and wheel chocks, don’t rely on a jack alone.
– Wear protective gloves and eyewear when handling brake parts.
– Be mindful of hot rotors, calipers and fluid if the vehicle was recently run.
– Clean any brake fluid spills immediately to avoid damage to paint.
– Never use compressed air to clean brake parts.
– Handle brake parts carefully to avoid damaging delicate components.
– Dispose of old brake parts and fluids properly.
– Take your time and don’t rush through the job. Double check all work.
– Road test the vehicle carefully before regular use after a brake service. Check for any pull, vibration, noise or change in pedal feel that could indicate a problem.
Step-by-step guide for changing brakes
Here is a general process for replacing brake pads and rotors on a typical vehicle:
Inspect brakes and order parts
Assess brake wear and damage. Order required replacement parts and tools before service.
Prep work
Loosen wheel lugs, then lift and support the vehicle. Remove wheels to access brakes.
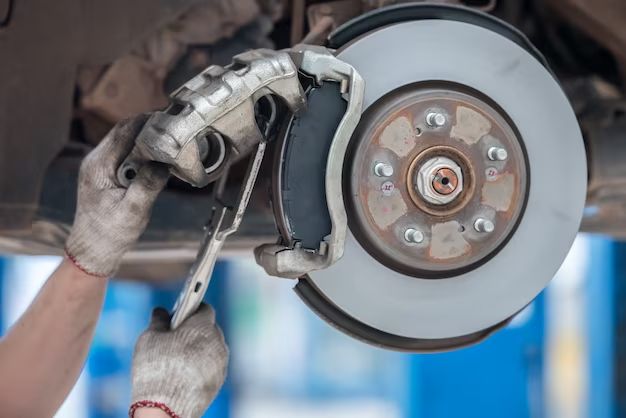
Remove caliper
Unbolt, unclip or swing caliper out of the way. Hang or support securely.
Remove pads and hardware
Take out old pads, retainers and anti-rattle clips/springs. Inspect caliper bracket.
Replace rotors
If worn, remove old rotor, clean mounting surface and install new rotor.
Clean and lubricate parts
Use brake cleaner and shop towels to clean caliper bracket, caliper and rotor. Lubricate parts as needed.
Install new pads and hardware
Insert new pads, clips, springs as needed. Make sure pads are seated flush in caliper.
Replace caliper
Swing caliper back into place over new pads and rotor, reinstall mounting bolts and tighten to spec with torque wrench.
Reinstall wheels
Put wheels back on studs and snug lugs in criss-cross pattern.
Lower vehicle
Raise vehicle off stands, then remove stands and chocks.
Bleed brakes
Bleed brake system at all four wheels to remove any air introduced during service. Top off fluid as needed.
Road test
Carefully test brakes at low speeds to ensure proper operation before regular use.
Conclusion
With the right parts, tools and knowledge, home mechanics can safely change their own brakes and save on shop repair costs. Always refer to manufacturer service procedures for your specific vehicle. Take your time and focus on quality work. Changing brakes yourself keeps more money in your pocket and gives you confidence in this vital safety system.
