A well pressure switch is a critical component of a water well system. It controls when the well pump turns on and off in response to drops in pressure in the water line. Proper placement of the pressure switch is important for ensuring smooth and efficient operation of the well pump.
Page Contents
What does a well pressure switch do?
A well pressure switch senses the water pressure in the pipes coming from the well. When a faucet is opened, pressure drops as water starts flowing. This drop in pressure signals the switch to turn on the pump motor to raise the pressure back up. Once pressure reaches the preset “cut-in” point, the switch turns the pump off again. This cycle repeats every time water is used from the system.
The pressure switch thus maintains pressure within a preset range – between the “cut-in” point where the pump turns on and the “cut-out” point where it shuts off again. This prevents the pump from short cycling on and off rapidly and provides smooth, continuous water flow.
Where should the pressure switch be located?
The well pressure switch should be located on the water line as close to the water storage tank as possible. It is usually installed above ground on the pipe exiting the top of the tank. This placement allows the switch to most accurately sense the system pressure for the following reasons:
- It is farthest from the pumping turbulence that occurs near the well pump itself.
- It avoids pressure drops from friction as water flows through pipes.
- The storage tank dampens pressure fluctuations.
Locating the switch close to the tank places it in the zone of least pressure fluctuation. This allows it to operate most efficiently.
Not too close to the pump
Installing the pressure switch too close to the well pump can lead to problems. The churning of water by the pump causes localized pressure variations. These pressure spikes and dips can confuse the switch, causing short cycling of the pump motor or failure to shut off.
It is best to locate the switch at least 10-20 feet from the pump outlet in the discharge line. This allows pressure to stabilize and smooth out before it reaches the switch.
At the tank outlet
The water storage tank on the system also helps dampen pump noise and pressure fluctuations. Water entering the tank passes through baffles which promote settling. Placing the switch at the tank outlet allows it to sense calmer, stabilized pressure.
The switch should be installed in a straight vertical run of pipe exiting the tank. Horizontal pipe can allow air bubbles to collect at the switch, affecting its pressure readings.
After other components
Any other components, such as filters or water treatment systems, should be upstream of the pressure switch. This allows the switch to sense the true pressure delivered to the house plumbing system.
For example, filters cause additional pressure drops. If the switch is upstream of the filters, pressure at the house will be lower than what the switch detects. Putting it downstream avoids this issue.
Pressure switch configurations
Well pump systems can have multiple pressure switches and pressure tanks configured in different ways. The placement of the switch may vary slightly for each setup.
Single switch
The simplest arrangement has a single pressure switch controlling one pump. The switch is installed after the pressure tank and set to turn the pump on and off at appropriate pressures.
Multiple switches
Larger systems may have 2 or more pumps and multiple pre-charged pressure tanks. In these cases, additional pressure switches are added to control the second, third, etc. pumps. The switches are staged to turn on pumps sequentially as needed.
The first switch still goes on the main pressure tank line to control the lead pump. Additional switches on the discharge lines control the lag pumps, turning them on and off as pressure dictates.
Transducer
Some systems use an electronic pressure transducer instead of a mechanical switch. Transducers are very accurate at reading pressure. The electronic control panel turns pumps on and off in response to the transducer readings.
The transducer is installed in the same place – at the outlet of the pressure tank. This allows it to accurately track real-time system pressure.
Pro tips for pressure switch placement
Here are some best practices to follow when installing a well pressure switch:
- Mount the switch vertically on an upright length of straight pipe at the pressure tank outlet.
- Position the switch at least 10-20 feet from the well pump.
- Make sure the switch wiring is not submerged in water or buried underground.
- Allow access to calibrate and service the switch in place when needed.
- Support the switch weight properly so vibration from the pump does not affect operation.
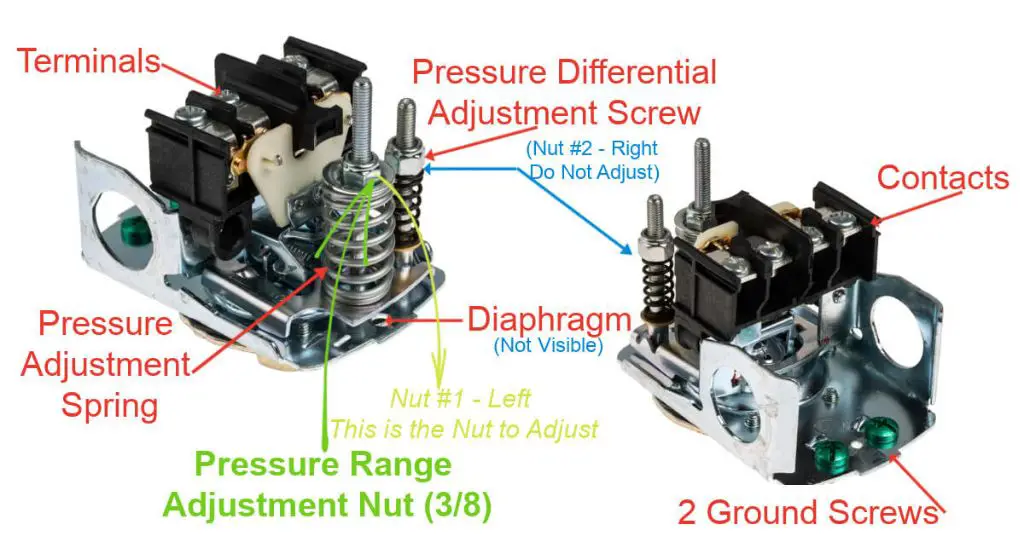
Checking and setting pressure switches
The pressure settings may need periodic adjustment, especially if the pump is short cycling on and off. You can check and change the “cut-in” and “cut-out” pressures using the adjustment screws. Typical settings range from 30-50 PSI (on) and 50-60 PSI (off).
More advanced digital switches allow very precise adjustment. Always set the “cut-in” pressure higher than the tank’s pre-charge pressure. Check manufacturer specs for recommended pressure settings.
Conclusion
Proper pressure switch placement and adjustment keeps a well system running smoothly without annoying pump cycling. Following the guidelines above allows the switch to accurately sense system pressure for controlled pump operation.
While some variation in configuration is possible, the standard recommended location is:
- On the main pressure tank outlet pipe
- 10-20 feet from the well pump
- Vertically oriented
- Accessible
Taking care to position the pressure switch in the optimal location will maximize performance and life of your well pump and water system.