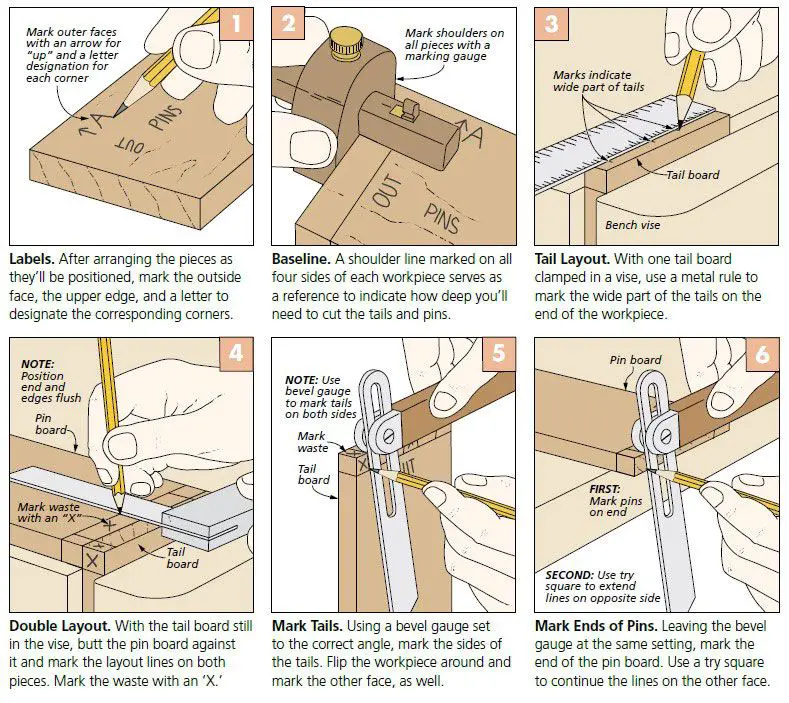
When cutting a dovetail joint by hand, the first step is to mark and cut the tails on the tail board. The tails are the angled protrusions that extend from the tail board and fit into corresponding angled sockets (called pins) cut into the pin board.
Page Contents
Marking the Tails
To mark the tails, begin by determining the size and spacing of the tails. Smaller tails spaced closer together create a tighter joint. Mark all of the tail cuts on the end of the tail board using a dovetail marker, sliding bevel, or just a pencil and protractor. Outline each tail to the desired size and angle, and make sure they are evenly spaced across the end of the board.
It is important that the tail cuts are marked accurately on the tail board before cutting them. Once the tails are cut, the tail board cannot be adjusted – the pins on the pin board must be marked and cut to fit the existing tails.
Cutting the Tails
There are two main ways to cut the tails after marking them out:
- Use a handsaw (usually a dozuki saw or other fine back saw) to cut right up against the waste side of each tail line. Remove the waste pieces with a chisel.
- Use a bandsaw or scroll saw to cut along the waste side of the lines first. Then chisel right up to the line to achieve a tight shoulder.
Whichever cutting method you choose, cut just to the waste side of the marked lines and do not cut into or sever the tails themselves. The chisel work brings the shoulders of the tails right up to the lines for a tight fit against the pins.
When all of the waste is removed between the tails, you are left with the completed tail board, ready to mark and cut the pins on the pin board.
Marking the Pins
With the tail board complete, the tail cuts can be transferred to the pin board. Line up the tail board on top of the pin board so the edges are flush. Trace along the edge of each tail with a pencil to transfer their location onto the pin board.
Then, mark the waste areas between each pin (essentially the inverse of the tails on the tail board). Leave enough space so each pin fits snugly between the tails. A dovetail marker makes quick work of marking the angled pins.
Cutting the Pins
The goal when cutting the pins is to sneak right up to the pencil line to create a tight fit against the tails. As with the tails, you can use a handsaw and chisel or a bandsaw and chisel. Take care not to cut beyond your marks into the pins themselves.
Remove all the waste material to leave the completed pins that should neatly intersect with the tails on the tailboard. Dry fit them together to check for any problem spots before doing final smoothing.
Achieving an Accurate Fit
Getting an accurate and snug fit when hand cutting dovetail joinery requires great precision in marking, cutting, and chiseling right up to your lines. Work slowly, check your progress often, and make small final trimming cuts and chisel trims to sneak up on that perfect fit.
Use a marking knife instead of a pencil and cut just inside your knife lines to get as tight to the lines as possible. Take the time to get the joint fitting perfectly before glue up – it’s worth the effort.
Tips for Cutting Dovetails by Hand
Follow these tips when cutting dovetails by hand for the best results:
- Use a sharp pencil and light marking pressure when laying out lines.
- Orient wood grain direction appropriately on both boards for strength.
- Cut tails with fine dovetail or Japanese pull saw for control.
- Make multiple light chisel passes when paring to lines.
- Sneak up on fit by trimming tails and pins accordingly.
- Adjust fit by marking problem spots and trimming just those areas.
- Allow sufficient time, patience and care when hand cutting joints.
Cutting Dovetails with Power Tools
While hand cutting dovetails is very satisfying, it’s also possible to cut accurate dovetails with power tools. This can speed up the process considerably.
Some woodworkers will cut the tails by hand but use a router table with a dovetail bit to cut the pins. This compromises some of the handwork while still getting a very tight fit.
You can also use a jig with your router table to cut both tails and pins. Leigh makes popular dovetail jigs that guide your router and allow variable spacing, angles, sizes and more. This automates much of the process for efficient and accurate dovetail joinery.
For the best flexibility, many woodworkers will cut as much as possible by machine but do the final trimming, fitting and smoothing work by hand. The perfect dovetail joint combines power tool convenience with fine hand tool precision.
Maintaining Sharp Tools
Having sharp tools is paramount when hand cutting joinery like dovetails. Sharpening your chisels, marking knife, and dovetail saw periodically will make the job much easier. You can use sharpening stones, diamond stones, or grinding jigs to maintain a razor edge.
Take the time to flatten the backs and hone a mirror polish on chisel and plane blades. A sharp edge reduces cutting resistance and helps you cut more accurately. Dull tools lead to tear out and poor quality hand tool work.
Conclusion
Cutting dovetail joints by hand involves first cutting and chiseling the tails on the tail board, then marking and cutting the pins on the pin board to match the tails. Work accurately and precisely, sneaking up on the lines to get a tight fit when assembling the joint. With practice and sharp tools, you can achieve beautiful and strong hand cut dovetail joints.
