Knowing how to properly wire a circuit breaker is crucial for completing electrical projects safely and correctly. While it may seem intimidating, wiring a circuit breaker is not overly complicated when you understand the basic steps. In this comprehensive guide, we will walk through the complete process of wiring a circuit breaker, from start to finish.
Page Contents
What is a Circuit Breaker?
A circuit breaker is an essential safety device that is designed to protect an electrical circuit from damage caused by overcurrent or short circuit. It monitors the amount of current flowing through the circuit and will automatically “trip” or switch off if the current exceeds a safe level. This prevents fires, damage to equipment, and electrocution.
Circuit breakers are typically found in the main electrical service panel. They come in different amperage sizes to suit the circuit they are protecting. For example, a 15 amp breaker is designed for a circuit with light loads, while a 50 amp breaker can handle much larger loads from appliances. When tripped, the lever on the circuit breaker will flip to the “off” position.
Types of Circuit Breakers
There are a few different types of circuit breakers:
- 1. Thermal magnetic circuit breakers – These have a bimetal strip that heats up and bends when overcurrent flows. If the overcurrent continues, the magnetic field created trips the breaker. They respond quickly to large overloads but slower to long-term lower level overloads.
- 2. Magnetic circuit breakers – These contain an electromagnet that trips the breaker when sensing high current. They react very quickly but do not respond to low-level overcurrents.
- 3. Hydraulic magnetic circuit breakers – These combine the benefits of thermal and magnetic breakers. They provide quick response to high overcurrents but also respond to low-level sustained overloading.
- 4. GFCI circuit breakers – GFCI (ground fault circuit interrupter) breakers detect smallleakage currents and trip to prevent electrocution. They provide important protection in bathrooms, kitchens, garages, and outdoor circuits.
- 5. AFCI circuit breakers – AFCI (arc fault circuit interrupter) breakers detect dangerous electrical arcing in the circuit and shut off power to prevent fires. They are now required in new bedroom circuits.
The most common types are thermal magnetic breakers and GFCI breakers when protection from ground faults is needed. Knowing the type of circuit breaker you have is useful when troubleshooting tripping issues.
Circuit Breaker Parts
Circuit breakers have a few important components that allow them to detect overcurrent conditions and trip the circuit:
- Contacts – Allow current to flow through the breaker when closed. They are opened by the tripping mechanism to stop current flow.
- Bimetal strip – Responds to heat from overcurrent. It bends and trips the breaker contacts open.
- Magnetic solenoid – Creates a magnetic field when current flows through the wire coil. Trips the contacts open in response to very high overcurrent.
- Trip mechanism – The part that physically causes the contacts to open. Usually a lever or latch that the bimetal strip or solenoid act on.
- Toggle mechanism – Switches the contacts between closed and open when the breaker is turned on and off.
Understanding how these components interact is helpful when installing or troubleshooting a circuit breaker.
Circuit Breaker Sizing
Choosing the proper circuit breaker amp rating for the wire size and loads on the circuit is critical. The breaker must be sized to carry the current needed for the connected devices but also trip before the current exceeds the safe capacity of the wiring.
Here are some key breaker sizing guidelines:
- Do not exceed 80% of the wire’s current rating. For example, use a 15A breaker on a circuit with #14 wire (rated for 15A).
- Select the next common breaker size above the calculated load. For example, for a 9.5A load use a 15A breaker.
- For continuous loads, reduce the breaker size by 20%. For example, for a 12A continuous load use a 15A breaker (20% less than the next size up of 20A).
- Check the nameplate current rating for large appliances and use a breaker sized accordingly.
- Breakers for 240V circuits typically come in smaller 10-70A sizes compared to 120V (15-100A).
Oversizing the breaker means it may not trip when it should. Undersizing can lead to nuisance tripping. Getting the size right is key to safety and proper function.
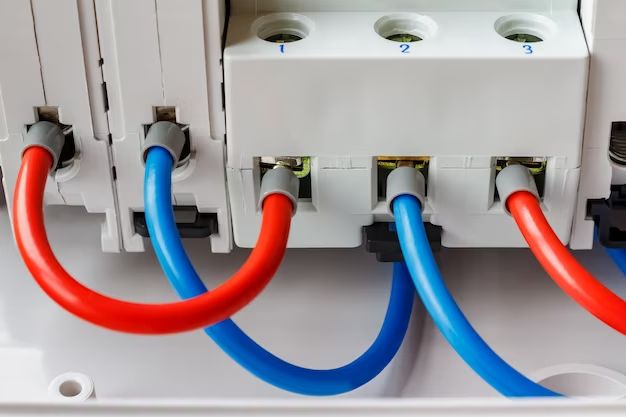
How to Wire a Circuit Breaker
Now that we’ve covered some important circuit breaker basics, let’s look at how to connect the wires properly when installing or replacing a breaker:
- Turn off the main breaker – Locate the main breaker supplying the panel and turn it to the “Off” position. Verify power is off with a non-contact voltage tester.
- Open the panel cover – Unscrew and remove the cover protecting the circuit breakers.
- Remove old breaker (if replacing) – Carefully remove any old breaker by loosening screws or removing the retaining clip.
- Position new breaker – Orient the new breaker so the on/off switch lines up properly and insert into the bus clip or rails per manufacturer instructions.
- Land and tighten hot wire – Loosen the hot terminal screw and insert the black “hot” wire in a clockwise direction. Tighten screw securely.
- Land neutral wire – For 120V circuits, insert white neutral wire into neutral terminal and tighten screw.
- Land ground wire – Insert bare copper ground wire into ground terminal and tighten screw.
- Double check connections – Verify wires are landed properly and all screws are tight.
- Turn main breaker back on – Carefully switch main breaker back to “On” position to restore power.
- Test operation – Turn breaker on and off a few times and check for proper function.
Always take appropriate safety precautions and use PPE when working with electrical wiring. Follow local electrical codes and permit requirements when installing or replacing breakers.
Circuit Breaker Wiring Diagram
Referring to a wiring diagram is recommended to confirm proper wire connections. Here is a basic 120V circuit breaker wiring diagram:
| Circuit Breaker | Connection | Wire |
|---|---|---|
| Hot Terminal | Black Wire | Hot/Live |
| Neutral Terminal | White Wire | Neutral |
| Ground Terminal | Bare Copper Wire | Ground |
For 240V circuits, the connections would be as follows:
| Circuit Breaker | Connection 1 | Wire 1 | Connection 2 | Wire 2 |
|---|---|---|---|---|
| Hot Terminal L1 | Black Wire | Hot/Live L1 | Red Wire | Hot/Live L2 |
| Ground Terminal | Bare Copper Wire | Ground | Bare Copper Wire | Ground |
Consult the manufacturer’s documentation for any specifics on the wiring connections.
Common Circuit Breaker Problems
Circuit breakers are generally very reliable but occasionally issues can develop. Here are some of the most common circuit breaker problems:
- Nuisance tripping – Breaker trips frequently under normal loads. Usually due to loose connections, undersized wires, overloaded circuit, or defective breaker.
- Won’t reset – Lever will not stay on when attempting to reset breaker. Indicates defective trip mechanism.
- No power – No power downstream even when breaker is on. Often due to loose/open wire connections.
- Burning smell – Unusual odor from breaker indicates overheating wires or breaker contacts beginning to fail.
- Buzzing/humming – Unusual noises point to loose connections or arcing.
- Sticking/jammed – Problems switching breaker on or off. Commonly caused by dirt, corrosion, or mechanical issues.
Diagnosing the root cause of any circuit breaker issues using a multimeter and visual inspection can help identify whether wiring repairs, connection tightening, or full replacement is needed.
Replacing a Circuit Breaker
Over time, circuit breakers can wear out or become defective. Here are the basic steps for replacing an old circuit breaker with a new one:
- Turn off the main breaker and verify power is off to the circuit breaker.
- Open the dead front panel covering the breakers.
- Remove the wires from the old breaker one at a time.
- Take note of the amp rating and type of the old breaker.
- Remove old breaker from the panel.
- Install new breaker of the same amp rating in the same location.
- Re-land wires on the new breaker terminals.
- Tighten all electrical connections securely.
- Close the dead front panel and turn main breaker back on.
- Test operation of the new breaker.
Take photographs before removing the old breaker to help with proper installation of the new one. Only replace with a breaker of the same amperage rating and follow all electrical safety procedures.
Conclusion
Installing and wiring a circuit breaker properly is an essential electrical skill. By understanding basic circuit breaker operation, sizing, wire connections, and troubleshooting techniques, you can take on breaker projects with confidence. Always exercise caution when working with electrical systems and consult a professional electrician for complicated or hazardous wiring jobs. Follow local codes and permit regulations in your area.