If you are noticing leaks around the connections of your coolant hoses, there are a few potential causes to investigate. Coolant leaks can lead to overheating and damage to your engine if not addressed promptly. In this article, we will examine the most common reasons for coolant hose connection leaks and the steps you can take to fix them.
Page Contents
Quick Overview of Potential Causes
Here are some of the most common reasons you may find coolant leaking from the hose connections:
- Worn out hoses – Hoses degrade over time and eventually crack, allowing coolant to leak out.
- Loose hose clamps – The clamps securing the hoses can become loose over time due to vibration, allowing leaks.
- Damaged hose fittings – Corrosion or impacts can damage the fittings where hoses connect, leading to leaks.
- Incorrectly installed hoses – Hoses that are not properly routed or connected can leak over time.
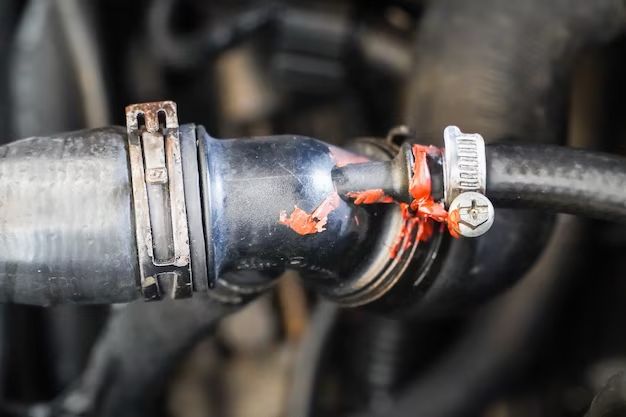
To confirm the source of the leak, visually inspect all coolant hose connections on your engine. Look for wetness, stains, or crustiness around the connections indicating seepage. Coolant leaks often leave behind a white, crystalline residue when they dry.
Inspecting the Hoses
The first step in diagnosing connection leaks is thoroughly inspecting the coolant hoses themselves. Check along the entire length of each hose for the following issues:
- Cracks or punctures – Small cracks or holes anywhere in the hose can weep coolant. Also look for bulges or soft/spongy spots indicating internal degradation.
- Dry rot – Hoses degrade from the inside out. They may look okay externally but have brittle, cracking rubber inside.
- Leaks at joints – Most hoses are made of multiple pieces joined together. Check these joints for seepage.
Any hose with visible exterior damage is suspect and warrants closer inspection or replacement. As hoses age internally, they become prone to bursting which can lead to major coolant loss. If a hose shows signs of wear, don’t take chances – replace it.
Inspecting Hose Clamps
The clamps provide the tight seal between hoses and fittings they connect to. Loose clamps result in leaks. Here’s what to look for:
- Tightness – Try tightening the clamps by hand or with pliers to eliminate simple looseness.
- Corrosion – Rust on the clamp or fitting can prevent adequate tightening.
- Damage – Cracks or deformities in the clamp can prevent a tight seal.
Badly corroded or damaged clamps should be replaced. Use screwdrivers or ratchets to ensure clamps are tightened to their fullest extent. Overtightening can split or deform clamps, so take care and tighten only until snug.
Inspecting the Connections
In addition to the hoses and clamps themselves, also closely inspect where hoses connect to components like the radiator, water pump, engine block, and heater core. Look for:
- Corrosion – Corroded fittings prevent tight seals. Clean off any visible corrosion.
- Cracks/damage – Any damaged fittings should be replaced.
- Wrong sized hose – A hose that doesn’t properly fit the fitting can leak over time.
Make sure all fittings are the proper shape and diameter for the hoses attached. Check connector threads for damage and ensure hoses fit snugly when tightened. Replace any suspect fittings to prevent ongoing leaks.
Removing Stuck Hoses
When attempting repairs, hoses or clamps can become stubbornly stuck to fittings they have been mated to for years. Here are some tips for removing stuck hoses safely:
- Use penetrating oil like WD-40 to loosen the connection and allow things to separate more easily.
- Twist the hose back and forth while pulling to break the seal.
- Use a small hammer or mallet to tap the area and jar things loose.
- Check for screws on clamps and use a screwdriver to loosen them before pulling.
- Use pliers or hose clamp pliers to get better grip and leverage on hoses and clamps.
- Heat can help soften and expand stuck rubber hoses. Use a hair dryer or heat gun carefully.
Take your time and don’t force things or you may damage the hose. If you absolutely cannot separate the hose, you may have to cut it to fully remove it and then replace it with a new one.
Replacing Coolant Hoses
If your inspection reveals significant cracking, dry rot, bulging, or other degradation of the coolant hoses, replacement is the best option. Here are some guidelines for replacing coolant hoses:
- Purchase replacement hoses designed specifically for your make/model vehicle.
- Ensure the inner diameters and lengths match the original hoses.
- Check that allnecessary junctions, bends, and ends are present.
- Use new clamps sized appropriately for the new hoses.
- Make sure protective sleeves are installed where hoses contact other components.
- Route the new hoses identically to the originals.
Take photos or make diagrams of the existing hose routing to use as references when installing the new hoses. Improper routing can lead to kinks, abrasion, and new leaks.
Tips for Replacing Coolant Hoses
Here are some useful tips to keep in mind when replacing coolant hoses:
- Inspect all other hoses while doing the job. Replace any others that are degraded.
- Clean fittings thoroughly before installing new hoses for a tight seal.
- Lubricate the insides of new hoses and fittings with fresh coolant or water.
- Orient clamps so the worm drive screw is easily accessible for future adjustments.
- Fill the cooling system and check for any leaks after replacing hoses.
- Properly dispose of contaminated coolant after completing the repairs.
Taking the time to correctly replace aged coolant hoses helps ensure your cooling system remains leak-free and prevents overheating problems down the road.
Fixing Damaged Hose Connections
If you find a specific hose connection is leaking, you may be able to fix it without replacing the entire hose. Here are some tips for repairing damaged hose connections:
- Thoroughly clean the connection of any gasket remnants, corrosion, or coolant residue.
- Inspect the connector hardware – any worn, cracked, or damaged pieces should be replaced.
- Make sure the connector surface is smooth and install a new gasket.
- Apply thread sealant to prevent leaks on any threaded fittings.
- Ensure connectors and hoses align properly when tightening everything down.
- Tighten connections to the specified torque if possible.
- Check for leaks after refilling the cooling system.
Sometimes damaged connectors simply cannot be fixed reliably. You may need to replace hoses or fittings if repairs don’t solve the leaks. Check your vehicle repair manual for the proper procedure if replacement is required.
How to Avoid Future Leaks
Proper maintenance and installation is key to preventing leaks at coolant hose connections over the long run:
- Replace hoses at recommended service intervals or when cracking/degradation is spotted.
- Use quality clamps that won’t corrode or work loose over time.
- Ensure proper torque on all connection hardware.
- Always use appropriate gasket sealant when re-assembling connections.
- Keep oil and contaminants from degrading rubber hoses.
- Avoid kinking or over-tightening hoses during installation.
Periodically check hose connections by inspecting for drips or crusty buildup around ends. Catching minor seepage early prevents major leaks down the road. Consider replacing any hoses older than 5-7 years as preventive maintenance.
| Coolant Hose Issues | Potential Causes | Solutions |
|---|---|---|
| Split/cracked hose | Old age, dry rotting, improper routing leading to kinks/abrasion | Replace hose, ensure proper installation |
| Bulges in hose | Internal delamination or reinforcement breakdown | Replace hose immediately before burst |
| White crust at connections | Small seepage from loose clamp or damaged fitting | Clean connections, tighten clamp, replace fitting if damaged |
| Clamp slipping | Corrosion preventing adequate tightening | Clean or replace clamp, tighten securely |
| Persistent leaks at connection | Damaged hardware, misaligned components | Ensure proper fitment, replace any damaged pieces |
When to Seek Professional Help
While many coolant leaks at hose connections can be repaired with routine DIY maintenance, sometimes it’s best to have a professional mechanic inspect and repair stubborn or severe leaks:
- If the leaks are from hard steel coolant pipes rather than flexible hoses.
- If the leaking connection is in a hard to reach location.
- If the components show extensive corrosion or damage.
- If the cooling system needs to be fully drained and refilled after repairs.
- If the leak persists after your own repair attempts.
- If overheating or low coolant levels occur along with the leaks.
Auto shops have specialized tools and connections to coolant pressure testing and refilling equipment. They can diagnose where and why leaks are occurring and confirm repairs have fixed them. Seeking professional assistance can save time, prevent mistakes, and provide peace of mind that problems are fully resolved.
Conclusion
Leaks at coolant hose connections are often repairable with basic mechanical skills. Inspect hoses and connections thoroughly for any signs of seepage or damage. Replace degraded hoses and ensure clamps are tight. Clean and tighten fittings or replace damaged pieces as needed. Periodically inspecting and maintaining the cooling system prevents small seeps from becoming large leaks over time. Seek professional assistance for leaks that persist after attempted repairs.